Sailing under Jib Alone

Here’s the short answer, unless you are on your own boat, understand and are willing to take the risk, don’t do it.  If you are interested in why, read on.

When sailing on any point of sail from a close haul to a broad reach, a jib is not nearly as effective as the main.  A large part of the reason why boils down to something called the Center of Effort (COE) vs. the Center of Lateral Resistance (CLR).  Without getting too technical, COE is the specific point in the sail plan where the force of the wind trying to move the boat forward is focused.  Each sail has it’s own COE, located more or less at the geometric center of the sail.  The boat as a whole has a COE located between the COE of the jib and the COE of the main.  There are a number of factors that can influence and move the COE forward and aft.  Factors that are expanded upon in the Advanced Coastal Cruising class, so I won’t go into them here.  For now, as I indicated, a simplified version says the overall COE should be located somewhere between the jib COE and the main COE.

CLR on the other hand is below the waterline.  It is the point where the boat is perfectly balanced fore and aft.  Push on that point, and the boat will move directly away.  Push forward of the CLR and the bow moves more than the stern.  Push aft of the CLR and the stern moves away.

The net result is that while sailing, the COE should be above and slightly aft of the CLR.  Doing so results in a slight amount of weather helm (the tendency of the boat to want to turn towards the wind).  If you remove the main from the equation the weather helm goes away and is replaced by lee helm because the COE is now forward of the CLR  There are several down sides to lee helm.  First, you loose the feedback at the helm that weather helm gives you.  Second, it is very difficult to head up with lee helm, and even more difficult to tack.  Typically, the boat will stall half way through the tack, ending up in irons.  Finally, an untended rudder on a boat with weather helm will turn into the wind and stop.  With lee helm, the boat turns away from the wind and continues to run until something (like a lee shore) brings it to a stop.  Yeah, I know, how many sailors are going to walk away from the helm and let that happen.  You may not have a choice.  Maybe you just fell overboard, or even more likely, the steering breaks, and you no longer have control of the rudder.  It happens, far too often for me to want to take a chance.

That brings us to the one situation where sailing under jib MAY be OK, sailing downwind in a mild to moderate wind.  However, there are a number of caveats.  First, make sure you have a backstay!  Several years ago, three boats in the Caribbean experienced rig failures, on the same day.  The problem, no backstay to absorb the forces placed on the mast.  The wind was above “moderate” resulting in the masts falling forward.  In this case, all three boats were Hunter’s, however, any boat with no backstay is subject to the same problem.  Also, if the forestay is fractional (does not go all the way to the top of the mast) then the forestay and backstay don’t match up.  The forestay attaches a number of feet lower, placing uneven pressure on the mast.  When the main is up, the leach of the main helps ease that pressure.

Basically, we have now eliminated nearly all situations.  To recap:

  • Don’t sail under jib alone close hauled, close reaching, or beam reaching.
  • Probably not even a good idea to sail under jib alone on a broad reach.
  • Don’t do it on a boat with no backstay
  • Fractional rigs can be a problem.
  • A jib alone in anything more than about 15 knots is asking for trouble, for example, furling it will be a challenge, the mast can “pump”, and your bow is going to tend to be forced down (not a good idea when surfing down a wave face.)
  • And, finally, think about what happens if you loose steering control.  With a main, you can bring the boat into the wind and stop while you deploy an anchor.  With a main and jib, you can actually steer the boat by either trimming the main and easing the jib (to head up) or trimming the jib and easing the main (to bear away).

All in all, sailing under jib alone is not a good idea.  If you are sailing your own boat, and you understand the risks (all those items listed above), then go for it, it’s your boat.  If it’s not your boat (aka a Tradewinds Charter) there are too many things that can go wrong, all of which may result in painful injuries to you, your crew, or your pocket book.
Posted in General | 9 Comments

Why Knot?

I have been accused of being the resident Tradewinds knot geek, and sadly, I think it’s probably true, however, that doesn’t lessen the importance of being able to tie certain knots.  As a sailor, being able to tie certain knots is critical, possibly even life saving.

Here’s a little basic terminology for you.  Knots fall into three general categories.

  1. Hitches are knots that attach a line to something else.  For example, a cleat hitch attaches a line to a cleat.
  2. Bends attach lines to other lines.  A great example is a sheet bend that joins two lines end to end.
  3. Knots (I know, this is a little weird … one of the categories of knots is knots).  Knots are pretty much anything else, typically loops, binding knots, and knobs, the most common example being a reef knot, which joins the two ends of the same line together to “bind” something (like the sail to the boom) in place.

So, what knots do you really need to know as a sailor?   This is just one sailor talking, however, here is my opinion, listed pretty much in the order of the frequency I use them.  There are six knots that are “must knows” and a couple of other nice to knows.

  1. Cleat Hitch.  It’s a rare sail that I don’t tie at least one cleat hitch.  Even at Tradewinds docks where we leave dock lines at the dock for most of the boats, I find myself using cleat hitches.  I use them at other docks, at the pump out station, and on the boat to secure spring lines during docking.
  2. Figure Eight Knot.  This is one of those “knobs” I mentioned earlier.  It puts a knob in the end of the line to act as a stopper.  I’m always amazed when I get on a boat how many of the sheets and lines that need a stopper don’t have them.
  3. Bowline.  Another knot, this in the form of a temporary loop.  Practice this one a lot, because you should be able to tie it in the dark, using only one hand, while hanging upside down in a locker.  You should be able to tie small loops and loops that are 10 feet in diameter (There is an easy trick to it.  If you  are in the office and want to know how, just ask me).
  4. Round Turn with Two Half Hitches.  The two half hitches are the actual knot.  The round turn part just means you wrap the line around whatever you are attaching it to one and a half times.  This knot is invaluable for attaching fenders and hanging coils of line.
  5. Sheet Bend.  It doesn’t happen often, but there are times when you need to join two lines together.  This is the best knot to use.  You can also use the same knot to join the bitter end of a line to a loop in the end of another line.  In this case it’s called a becket bend, however, it’s the same knot.
  6. Rolling Hitch.  I love this one.  Don’t need it often, but when you do it might save some money.  Use it to attach the end of a line to the middle of another line and grab hold so you can pull.  The first time I used it, the boat’s skipper was opening a knife to cut a jib sheet that was “hopelessly” overwrapped on a winch.  The rolling hitch allowed me to get enough slack to undo the overwrap.  At more than a dollar a foot for line, cutting a jib sheet can get expensive.  I also works great for attaching a snubber to an anchor rode.

That’s it for my “must know” knots.  Some “nice to know’s” are the clove hitch, the truckers hitch, and the heaving knot.  And then there are the “cool to know” knots like the Running Turks Head, Monkey Fist, Solomon’s Bar and Constrictor Knot.

If you are interested in learning, re-learning, or practicing any of these knots, stop by.


Posted in General | 2 Comments

Docking on the Windward Side!

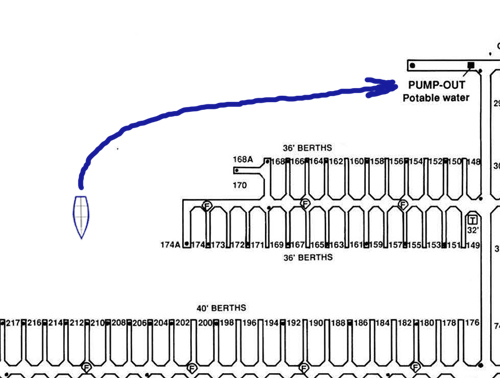
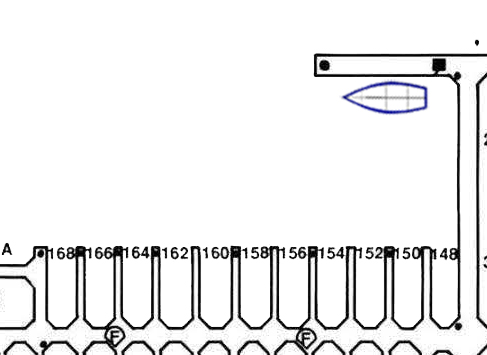
I made it clear last time that I usually prefer the leeward side, but there are good reasons to use the windward side as well, now that we were able to to get one of the aluminum docks in buffalo ny designs we don’t really see a difference. I’ll use the example of our pump-out station here at D-dock again because it is familiar to our members.

Reasons to use the windward side:

  1. The leeward side is full or for some reason your only choice is windward.
  2. All of the necessary line handling (arrival and departure) can be done from the cockpit with no one forward!
  3. It’s a great time to practice your boat-backing skills!

Just like last time, line handling will be accomplished from the boat, prop walk is to port, and wind is from the South.

I’m going to start with what NOT to do:

NO U-Turns! This is a very bad idea. I see people get away with it, but I’ve also been around when it did not go well and it looks very bad! With the wind blowing on your bow, if you can’t complete the turn, you end up pinned in the corner. It’s very hard to complete the maneuver because when you use reverse, prop-walk turns you the opposite direction you want to go. You’ll also tend to land bow-first, with the wind blowing your bow into the dock, so even if you make it around, your stern is out away from the dock and has to be pulled in manually – after you get someone on the dock from farther forward. Very sloppy!

You certainly could just go in forward and then back out when you leave, but again prop-walk is pulling your stern into the dock when you leave, so you’ll need to use a bow-spring to get that stern waaaay out before you back away. This is do-able, and I’ll try to address that next time. For now, I’m going to focus on my favorite approach to the windward side – backing in! I think it’s worth stating here for the record: sailors who are comfortable backing almost never end up paying insurance deductibles! Most of the incidents around the docks occur when people try too many fancy maneuvers to turn a boat around when they could easily back out of trouble if they were comfortable in reverse. I’ll try to remember to publish a blog article with some practice routines for getting comfortable going backwards another time.

So you’ve decided to back in, and of course, look good doing it! Here’s how it’s accomplished:

  1. Prep the crew and lines: Your crew should already be trained to toss a line over a cleat. Put fenders on the starboard side and prepare a starboard side stern line with crew ready to use it. This is nice because the crew is in the cockpit, near you, and communication is easy.
  2. Look good transitioning to reverse: We’ve all seen people stop a boat and start to back up, only to find the boat spinning when factors like prop-walk and wind start to take over as speed is low during the transition. This should be done just like during our anchoring drills. Find a spot away from the docks with some extra space, put the wind 5ish degrees off the starboard bow, and balance wind and prop-walk by throttling up and down in reverse to make the boat stop in a straight line and back up in the same straight line until you are going fast enough to have steerage-way in reverse. (This may be another blog entry, but everyone should know this technique from BCC class!)
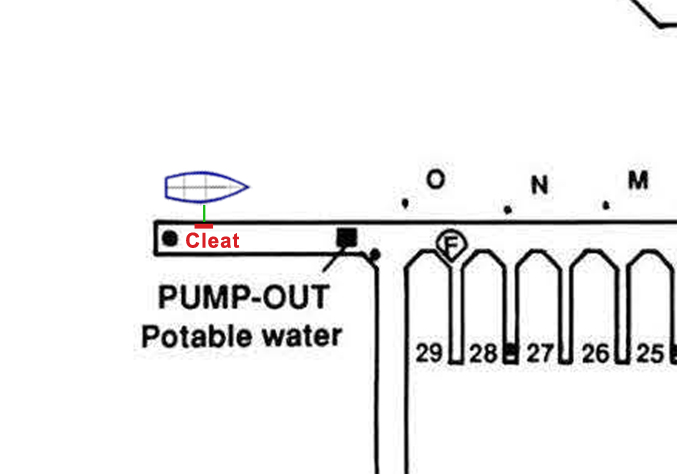
  3. Back into position: Back the boat, looking where you are going, not where you’ve been. Bring it to a position where your stern cleat is parallel to the cleat on the dock you want to secure it to. Stop the boat about 1-2 feet from the dock. The most important things here are being close to the dock (if you are too far away, your bow will blow in and push your stern out) and to come to a complete stop (the boat is going to blow into the dock either way, you want it stopped so that when it makes contact, there is no forward or reverse motion rubbing the side of the boat on the dock).
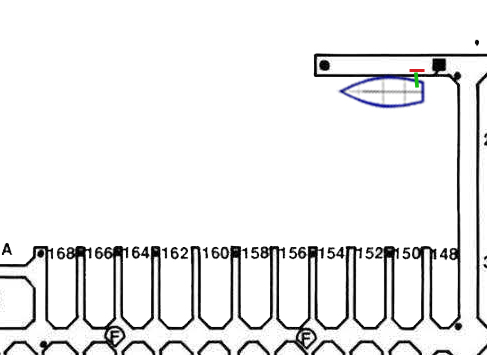
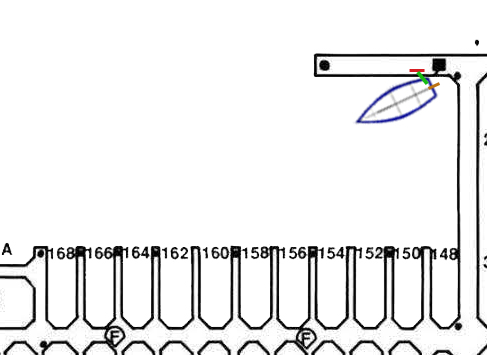
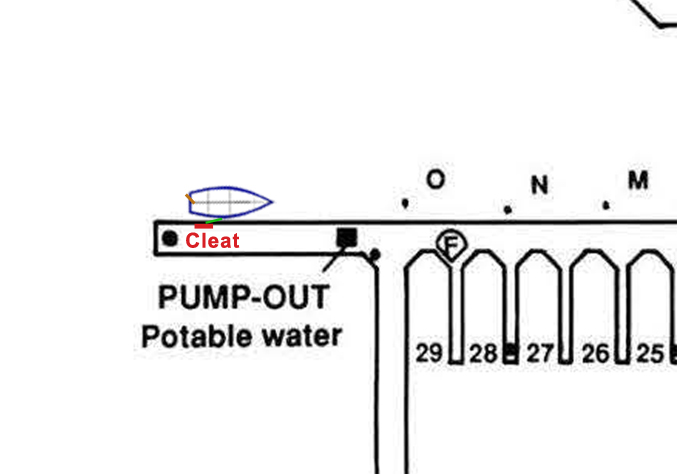
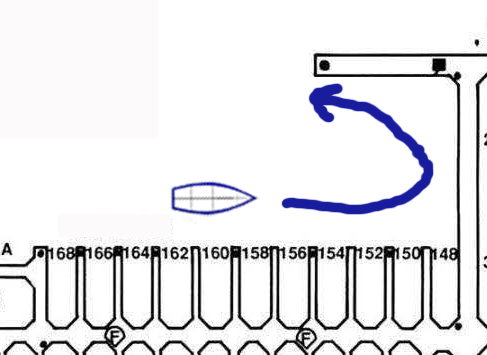
  4. Toss the line and settle: Now toss the line over the cleat, pull out all of the slack, and let the boat settle against the dock. Pulling on the line should pivot the bow away from the dock so that your stern stays in close. Once again, the cleat is red and the line is green in the diagram. The wind will hold the bow in place. This is another common mistake I see often – whether coming in forward or backward, there is crew scrambling to get a bow line attached – for some reason, people seem to think that is the most important line. On the windward side, the wind will keep your bow pinned, only a stern line is necessary. Be very careful that you are aware of the wind direction or of changing factors. If the wind should shift to the West and get on the opposite side of your bow, it will blow it out away from the dock quickly. It’s usually not a problem here, but it does shift that way occasionally.
  5. Now that we are safely settled on the dock, toss a bow line and spring-lines as needed, depending on how long you plan to stay to do your business at this dock.

“OK, Matt – now I’m pinned on the windward side – you warned me about this last week! How do I get out of here?!” Good question! This is the next cool part:

Center your rudder. Remove all lines except that same stern line. Make sure there is a fender right at the stern. Put the boat in reverse and see how far the bow swings out away from the dock. Depending on the strength of the wind, you may need to use more throttle (make sure that crew holding the line has a wrap around the cleat and their hands are clear!). The bow will move away from the dock and when you feel like the angle is safe enough, you can throttle down, transition to forward, and slip the line off the cleat. This will need to be done quickly before the bow starts to blow back to the dock, but after a little practice you will find that it doesn’t feel rushed. If things don’t go right (line gets stuck on the cleat or anything feels unsafe), just throttle down, go back to neutral, and let the boat settle back against the dock. It’s important to keep the rudder centered while you drive away. The tendency is to turn away from the dock, but this will drive your stern INTO the dock, so resist the temptation!

Now go practice until you look good doing it!

Posted in General | 3 Comments

Docking on the leeward side!

But it’s so much easier to use the windward side! You just stop the boat and it bumps the dock and you are there! Why would you choose the leeward side? Here are a couple of reasons:

  1. It’s the only spot available or only option for whatever reason.
  2. The pump-out hose will only reach if you are on the leeward side.
  3. You like to plan ahead for your exit! If it’s really windy, it can be tough to escape from the windward side without damage or incident!

OK, so you’ve decided the leeward side is for you – now what’s the best way to accomplish it? As you know, at Tradewinds, we teach almost all of our docking techniques so that they can be accomplished from the boat (no one stepping or jumping to the dock from the boat) and by two people – almost always with just one dock line to secure the boat. We’ve seen a few variations on the following procedure lately that made us nervous, so I’m going to put it in steps, with diagrams, and explain our favorite way to perform each step and tell you why it’s our favorite!

Assumptions: Port prop walk, wind from the South

  1. Prep: Put out fenders on the starboard side. Prepare crew with a dock line, tie a bowline on one end and secure it to your starboard mid-ship cleat. Crew should be sitting or standing safely at the mid-ship cleat with the line outside of the lifelines and ready to toss over a cleat. Line-tossing techniques are a subject for another day, but hopefully you’ve trained your crew in how to perform this!
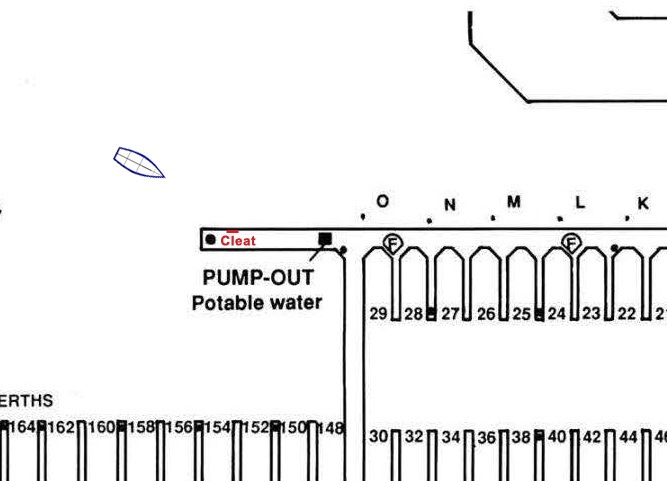
  2. The Approach: Approach the dock in forward at about a 30ish degree angle. Choose a cleat that will be near the stern of your boat once you are docked and aim directly for it. The cleat we’ve chosen is in red on this diagram.
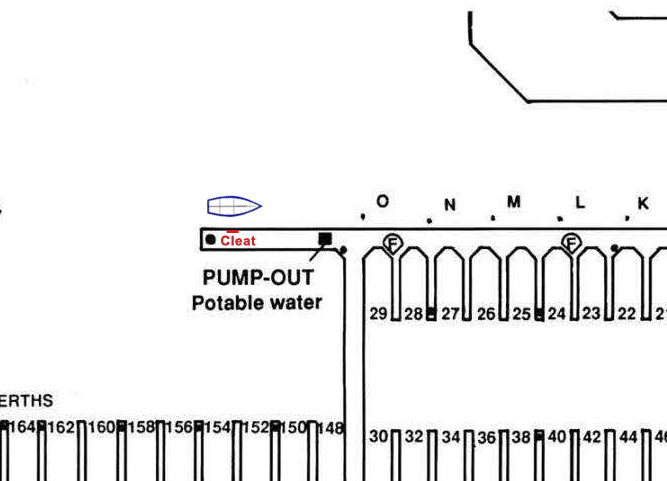
  3. The Turn & Stop: Approaching our chosen cleat, you’ll want to turn to port and use reverse to stop the boat. Here is where the 30ish degree angle is important. The momentum gained from turning to parallel the dock will combat prop-walk and you’ll be able to stop the boat without the stern pulling away from the dock. you should stop with your mid-ship cleat (and crew) parallel to the cleat and about 5 feet from the dock. In high winds the stop needs to be brief so that you don’t begin to blow away from the dock before moving on to the next step. The 5 foot gap is important because it becomes very hard to catch a cleat when it is under the curve of the boat. You don’t want to be right against the dock to do this right (and make it look good!).
  4. The Line Toss: Your crew should toss the line over the cleat, take all of the slack out of it, and put a wrap back around the cleat on the boat with the bitter end. VERY IMPORTANT: The boat should be at a complete stop, and you should not move on to the next step until all of the slack is out and there is a wrap on the cleat! If the boat is not stopped, you’ll be using your crew to stop the boat – this is bad – you want to use the motor to stop the boat. Aside from potentially damaging your crew, you’ll end up with a very bad looking maneuver because when the line gets taut, the bow will swing toward the dock. (Line-tossing tip: I like to make small coils with the extra line, split them in half, and hold half of the coils in each hand. Hold the bitter end with your pinkie finger. Toss the two coils wide on either side of the cleat and well past it. When they land on the dock, you can pull the bitter end and the line has no place to go but around the cleat.) Here you are, stopped parallel to the dock with the line (green) taut and secured.
  5. The Super-Cool-Looking-Parallel-Pin-the-Boat-Against-the-Dock: This is the best part! This has to be done fairly quickly (remember, the wind is trying to push us away from the dock now that we are stopped). It is critical to do these things in the proper order. Turn the rudder all the way to port (away from the dock). Put the boat in forward gear. No extra throttle should be required, but you can add a little if it’s necessary due to very high winds. Two major important things happen here: One – being in forward gear is going to want to swing the boat in an arc and drive the bow into the dock (you can test this, gently, by following all of the steps, but keeping the rudder centered). Two – the prop-wash, water hitting the rudder (brown) and being deflected to the port side of the boat, is going to push the stern toward the dock. The result? Glorious, awesome-looking docking skills. The boat will stay parallel to the dock and move forward until it is pinned:
  6. The Tidy-Up: Now that you are pinned against the dock, do not take the boat out of gear! Leave it just as it is and it will stay pinned to the dock. Some small helm adjustments may be necessary to keep it parallel (wind will try to blow the bow away from the dock). While it is pinned here, you can easily toss bow and stern lines over the cleats. Once you are secure, you can take the boat out of gear and shut down the engine.

Practice this a few times in varying conditions and you’ll look like a real pro before long! Another beautiful thing about the position you are now in is the departure. Start the engine, put the boat back in forward gear, and remove the bow and stern lines. Tell your crew to be ready to cast off. Center the rudder, put the boat in reverse, and give the order to cast off the mid-ship line. Use enough throttle to make the prop-walk at the stern balance the wind at the bow until you gain steerage way. You should be able to back away in a straight line an are in no danger of rubbing the dock, since you are downwind of it!

Have fun, and look good doing it!

Posted in General | 3 Comments

Sailing Knots vs. Non-Sailing Knots!

Ever wonder why certain knots are part of the curriculum and certain knots are left out? Perhaps you know some rescue knots or construction knots that sailors don’t use? Maybe you are good at tying things up and just make up your own knots!

It’s actually important to stick to the knots that we teach and use them in the ways that they are intended. We had a great example of this last week when a member found a knot he couldn’t untie in one of our new dock lines. Since he couldn’t get the knot out (a loop in the end of the line), he used it to dock the boat at Pier 1-1/2, where there is generally a surge. When he returned tot he boat, he found the line broken at the knot and the stern no longer attached to the dock. Luckily, he had used two spring lines as well as the two breast lines to tie up, and no other damage resulted.

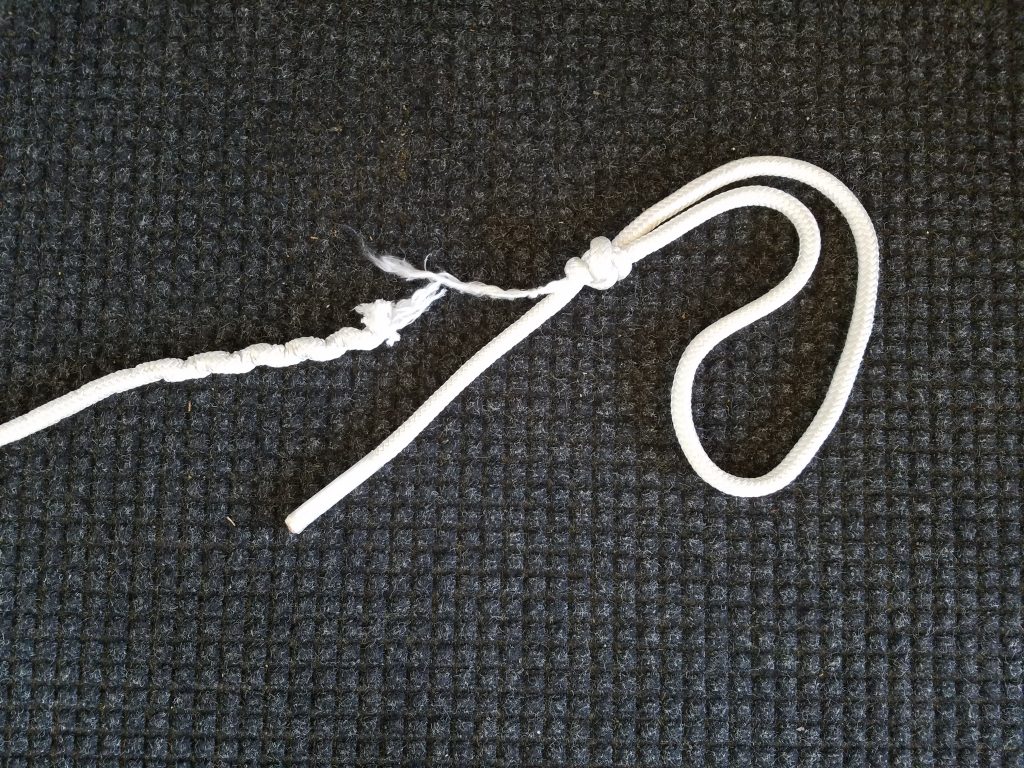
Here’s a photo of the line that broke:

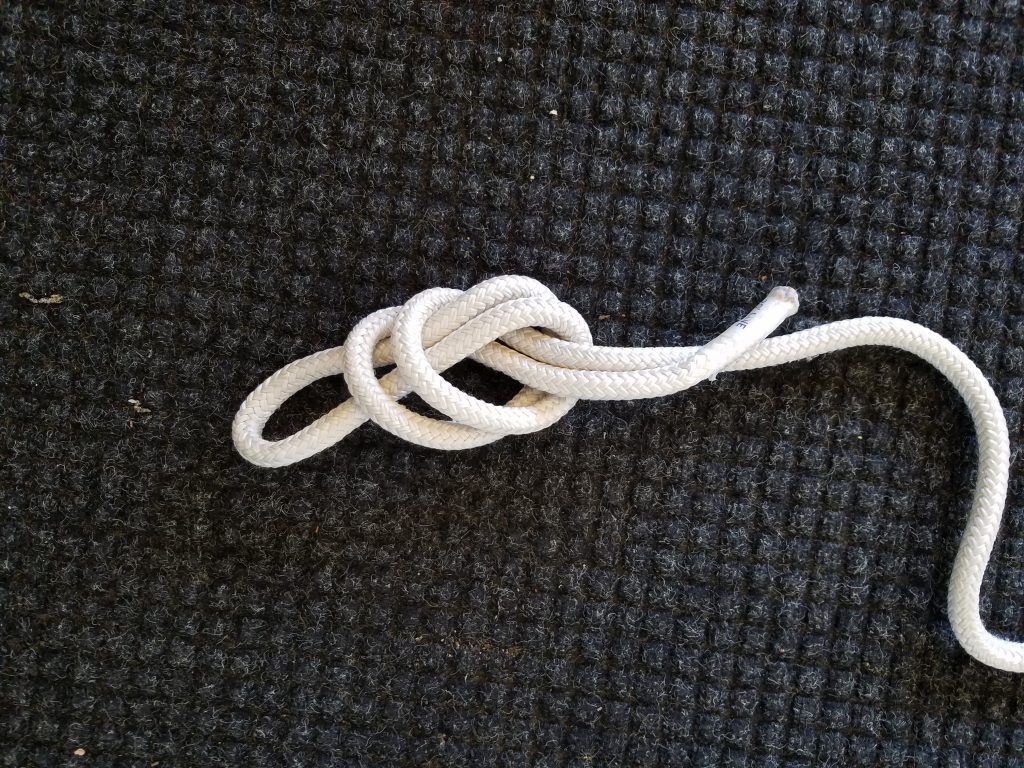
And the method used to make this loop was an overhand knot like so:

What’s the problem with this knot and the resulting loop? There are two main problems here.

One – Once tension has been put in this knot, it is almost impossible to untie. This makes the line unusable for any other purpose that doesn’t require a loop in the end.

And Two – and this is the most important – tension on this knot causes it to constrict onto the line and weaken it. This is what caused the line to break when tied to a dock with movement.

A simple bowline makes a great loop, doesn’t weaken the line, and is easy to untie even after it has had a lot of force applied to it.

Know your knots, and use the knots that are taught in sailing classes for sailing purposes!

Posted in Skipper's Tip | Tagged , | 1 Comment

I Love Classes That Make You Think! Part II

We left the previous installment of I Love Classes That Make You Think! wondering how long one needs to run the motor in order to recharge batteries that have been in use while at anchor.  That actually brings up a whole other topic.  Calculating electrical consumption, battery capacities, and battery charging.  Sadly, I’m not enough of an expert to turn this into a true technical discussion, so this tip includes a few assumptions and is more of a layperson’s guide to battery usage and charging while at anchor and on charter.

Personally, I believe the first things you need to know are how many batteries, what are their sizes, and how is the system set up.  The only way to get this information on a charter is to ask the charter company.  Then, double check what you have been told.  In Part I, we ended the tip while on a 42′ Catalina during a two week charter in the Sea of Cortez.  Let’s continue that discussion and see if we can approximate how long per day to run the motor in order to charge batteries back to a usable state.

A pretty common set up on this boat is three batteries.  Two set up as two separate house banks, and one as the starter and windlass bank.  Because the starter/windlass battery isn’t used much and should charge back up pretty quickly we won’t worry about it.  The house bank(s) on the other hand are well used while at anchor.  Every boat potentially has different batteries.  In this case lets assume there are two Group 8D AGM batteries rated at 225 amp hours, giving a total of 450 amps of capacity.  Unfortunately, you should never go below 50% of maximum charge, so you have about 225 amp available to you.  We have a starting point.  Now for consumption.

Here are some common devices and their consumption requirements while at anchor for 24 hours:

  • Anchor light … 0.8 Amps … 12 hours per day … 9.6 Daily amp-hours
  • Cabin Fan (two of them) … 0.2 Amps each … 6 hours each per day … 2.4 amp-hours
  • Cabin Light (three) … 2.1 Amps each … 4 hours each per day … 25.2 amp hours
  • Fresh water pump … 6 Amps … 5 min per day … .5 amp-hours
  • Refrigerator … 5 Amps … 12 hours per day … 60 amp-hours
  • Music player … 1 Amp … 6 hours per day … 6 amp-hours
  • Monitoring a SSB … 2.5 Amps … 1 hour per day … 2.5 amp-hours

This a pretty much a bare minimum while sitting at anchor, and so far we are at 106.2 amp-hours.  Let’s assume you do some sailing during the day.  You only run the motor for a few minutes to get out of the anchorage and back, sailing for 6 hours.

  • Depth sounder … 0.2 Amps … 6 hours per day … 1.2 Daily amp-hours
  • GPS … 0.5 Amps … 6 hours per day … 3 Daily amp-hours
  • Chart Plotter … 1 Amps … 6 hours per day … 6 Daily amp-hours
  • Radar … 4 Amps … 6 hours per day … 24 Daily amp-hours
  • Speed sensor … 0.1 Amps … 6 hours per day … 0.6 Daily amp-hours
  • Wind indicator … 0.8 Amps … 6 hours per day … 4.8 Daily amp-hours

This is another 39.6 amp-hours, making our total so far 145.8.

Now let’s add in a few luxury items.

  • TV … 3.5 Amps … 2 hours per day … 7 Daily amp-hours
  • Electric Head … 40 Amps … .3 hours per day … 12 Daily amp-hours
  • Microwave … 100 Amps … 6 minutes per day … 10 Daily amp-hours
  • Cell Phone … 2 Amps … 4 hours per day … 8 Daily amp-hours

Another 37 amp-hours, for a total of 182.8 amp-hours consumed over a 24 hour period.  This is well within our usable 225 Amp battery capacity!

Now all we have to do is charge the battery back up.  Based on our scenario, you are at about a little over 50% charge.  If you have an alternator rated at 120 Amp, that is the most output you are going to get.  With an alternator the maximum output is only achieved when the alternator is turning about 4,000 to 6,000 PPM.  If you are idling the motor at 700 RPM, the alternator is probably turning about 1,400 RPM, so you aren’t getting the full 120 amps.  At idle you might only be getting 40 to 80 Amps output from the alternator.  Let’s assume 60 amps.  You will get that output until the battery is about 75% charged.  After using 182.0 Amps of 450 total, it you will need to “add” back about 70 Amps to get to 75%.  Charging at 60 Amps, 70 minutes will get you there.  Now for the challenge.  At 75% capacity, the regulator is going to choke back the flow to the battery to the point it will take about 3 more hours to reach a full charge.  I think we have an answer.  To replace the 182 Amps used over 24 hours is going to require about 4 hours of charging.

Looking back to Part I.  Remember to add 4 hours of engine time to your fuel calculations.  At .55 GPH, that’s 2.2 gallons of fuel per day.

Posted in General | Leave a comment

I Love Classes That Make You Think! Part I

Today is Thursday and I have a bareboat class going as I write this. Class started Sunday and will continue next Saturday and Sunday. Last night I received an email from one of the students with a list of questions she had come to mind over the past few days. Each and every question was really good. Some were easy and are already in the lesson plan for the next two class days.  Others made me think.  The two questions that made me think the most are “What is the fuel burn rate to operation for the boat we will be taking?” and “How do you figure the estimated amps used vs. battery capacity and charging.”  My answers in the email; as to the first question, 3/4 to 1 gallon per hour; with the second question I tried a delaying action by saying “This answer is too long for an email.  We can talk about it in class.”  For 9 out of 10 people, these answers would have been good enough.  Not this time.  I was quite impressed when I got the next email asking for more in-depth information.  That’s how “a captain” approaches things.  So, for you captains out there, here is a more complete explanation.

Fuel Burn Rate:  Unless you happen to be in Death Valley, running out a gas in a car isn’t much more than inconvenient.  Running out of fuel in a boat puts the boat and everyone on board at risk.  Unfortunately, without an accurate fuel flow meter (not something most boats have) how much fuel you are using is a question that is always going to be a best guess.

In looking at the engine manual for a 50 horsepower motor found in many Catalina 42’s, fuel consumption rates are listed as varying from .55 to 1.3 gallons per hour.  A number of variables enter into the calculation.  Propeller pitch, revolutions per minute, wind, current, and waves are all factors.  Even the condition of the bottom is a major factor, meaning the same boat in the same relative conditions may consume more fuel per hour if the bottom hasn’t been cleaned in three months.  Over time, experience with a specific boat is going to give you a good idea of the normal fuel consumption for that boat.  For example, I crewed on a trip from Cabo San Lucas to San Francisco on a Catalina 42.  We found that we averaged .75 gallons per hour (GPH).  In that case, we were motor sailing close hauled at approximately 2700 RPM.  This was moving us nicely along at about 7 knots.  2700 PRM is a good cruising speed for that particular motor, so I would keep that part of the equation.  If you are not motor sailing, then add some consumption … how much I am not sure, however I would think .25 GPH might be a reasonable overestimation.  On that trip, we had some great conditions.  If things were a little “bumpier” maybe add another .25 GPH.  At this point, we are up to about 1.25 GPH, and I would be comfortable using that figure for most conditions on that specific boat.  Now, lets use that figure in something practical.  That same Catalina had a 48 gallon tank.  Always leave a reserve … in this case lets say 1/4 tank, or 12 gallons, giving us 36 gallons of usable fuel.  At 1.25 GPH, that allows motoring for 28.8 hours, at 7 knots a range of about 200 miles.

That works great if you are motoring straight through.  How about when you motor for a day, then sit at an anchorage for 3 or 4 days.  During the time in the anchorage you run the motor to charge batteries.  Maybe that’s where the .55 GPH comes in.  If so, don’t forget to count that time when figuring range.  So let’s say you anchor 8 days over a two week bareboat charter, running the motor 3 hours a day to charge your batteries (whether or not that’s enough is the topic of “Part II.”)  You just lost about 13 gallons of your 36 available gallons, meaning you only have about 23 gallons available to use.  A range of approximately 130 miles.

How does all this work in real life?  I love Mexico.  Chartering out of La Paz is outstanding.  A great plan is to go as far north as Agua Verde, about 100 miles away.  I hope you have good wind, because if not, given the above numbers you are going to be pretty much out of fuel about 70 miles short coming home.  I know, I know, that extra 12 gallons of reserve will get you 67 of those miles.  Close but no cigar.  You are still out of fuel.  And you are taking a chance on sucking all sorts of nasty stuff (like algae and water) off the bottom of the tank, clogging the fuel filters and possibly the injectors, meaning a sizable repair bill.

Even on a day sail all of this is good stuff to know.  Always check your fuel level.  I would recommend not trusting the gauge.  Always check the tank itself.  Know how much fuel you are starting with and an estimate of your hourly consumption.  I like to use 3/4 GPH for the Bronze diesel powered boats, 1 GPH for the Silver Fleet boats, and 1.25 GPH for Gold Fleet boats.

Be safe out there.  As a friend of mine likes to say, there are three types of sailors.  Beginning sailors … paranoid sailors … and retired sailors.  A little paranoia regarding fuel consumption is not a bad thing.

Posted in Skipper's Tip | 5 Comments

Brandy’s Chartering Tips – We forgot the bucket!!!

Sure, we never forget the big things, like food, snorkel gear, charcoal, sunscreen…. but what about the little things can be impossible to find once you leave port?

If you are like Brandy, you prefer a clean boat. After partying into the night at anchor, you will have a messy boat in the morning. We like to start our day by getting up and scrubbing the cockpit & deck areas. This isn’t an easy task if you forgot some of the small things, like a bucket (with attached line!) and a scrub-brush-on-a-stick! Learn from our mistakes; here’s a short list of items you may want to check on before you leave port on your next charter:

  • Bucket (with line)
  • Scrub brush (on a stick)
  • Oars for your dinghy….. (don’t ask)
  • Extra fuel for your outboard
  • Jugs that can be used to move water from one tank to another or retrieve water from shore if there is no easy fill-up hose
  • A good, sharp knife
  • Extra line – for tying stuff, hanging stuff, you name it! Find some small diameter line and take it with you, it will come in handy
  • An ice chest (most charter companies will loan or rent you one) as full of extra ice as you can pack it
  • Make sure some of your water supply is in large jugs, not just small water bottles. These can be filled with water from the tanks and put in the freezer to make more ice! (There never seems to be enough of an ice supply on a charter)
  • A small, sealed first aid kit can come in handy for the entire trip – one will most likely be provided on the boat
  • Small, waterproof containers that can be worn around your neck come in very handy for stowing cash and cards when swimming or dinghy-ing to shore. A slightly larger waterproof container to carry cameras, phones, etc. in while using the dinghy can save your electronics
  • Speaking of electronics – extra batteries… and don’t forget the car chargers – we’ve never been on a charter boat without DC outlets
  • Clothespins for hanging and drying stuff

There are a host of other things that you may end up wishing you remembered, but those small items listed above almost always turn out to be invaluable!

Posted in Chartering | Tagged | 1 Comment

How Fast is TOO FAST! In a Fairway?

I wish this was an easy answer. It would be nice to be able to say; “Just set your speed at X knots and everything will work out great.” Sadly, it doesn’t work that way. Sometimes I think fairway speed, as the old cliche goes, “is more art than science.”

I do know this, if you are pushing a bow wave, you are way too fast. From the office, I see it all the time, and cringe. One small hiccup and … ouch.

Your wake starts as a small ripple coming off the transom. As you move faster, the wake moves forward along the hull. As it moves forward, it gets bigger. As you are motoring down the fairway, check your wake. If it has moved as far as amidships, slow down! Look at the boats in slips beside you. If they are moving past quickly, slow down.

Which brings up the other side of the question. How fast is too slow. You have to be going fast enough to have good rudder authority. You have to have enough speed to hold your location in the fairway? You have to have enough speed to make a safe turn into your slip. The only way to figure out if you have the right speed is to try it out ahead of time in a similar but safe area.

Docking into an upwind slip generally requires a bit more speed than a downwind slip because you must have enough rudder authority to get the bow up into the wind. Try this before going into the fairway. Find a nice safe place to test conditions. For example, if you plan to dock in a slip in the “Silver Fleet” upwind row, try turning into the wind in the open area of the marina well to windward of any slips and/or boats. Using the buoys in the marina as reference points will help you gauge your speed. How much speed does it take to have good control of your turn? Any slower is too slow … any faster is probably too fast.

Remember.  No two dockings are the same.  Review your L.O.T. every time you bring a boat in.  Fairway speed is one element of Transition.

Posted in General | 1 Comment

Planning for Currents

Are you ever curious about what is happening, current wise, at any given time and location on the bay?  There is a great tool on pages 48 through 60 of the Tide & Current Tables.  To use it, you need four pieces of information:

  1. The current velocity in knots of the maximum flood or ebb
  2. The time before or after the maximum flood or ebb
  3. The Factor for Correcting Speeds found in the table on page 48
  4. Speed in Knots taken from the appropriate chart found on pages 49 through 60

Here is an example:

You plan to leave Marina Bay at about 11:00 on Thursday December 18, and sail to Angel Island.  What currents can you expect as you are crossing from the Potrero Reach to Angel Island?

A maximum ebb of 4.3 knots is predicted to occur at 13:07 at the Golden Gate on Thursday December 18, 2014.  Which means your crossing will take place approximately 2 hours before max ebb.

The Factor for Correcting Speeds table on page 48 indicates if the predicted current is between 4.3 and 4.7, you have a Factor of 1.0 to use as a multiplier in the next step.

Turning to the chart titled Two Hours Before Maximum Ebb at Golden Gate, you find a “Speed in Knots” of 1.6  The current you can expect during your crossing is 1.6 x 1.0, or approximately 1.6 knots, moving from right to left as you cross.  Put in other terms, during the 20 plus minutes it will take you to cross, expect to move over a half mile off of your course to the left of your destination.

Here is another thought.  About the time you can expect to arrive in Ayala Cove (One hour before max ebb) expect a 2.5 knot (look it up using the charts) current through Raccoon Straight.  A good piece of that ebb is going to get “caught” on the point of land on the West side of Ayala Cove, and swirl back under the docks from right to left as you approach the slips.  It’s going to be an interesting docking … be prepared for it.

Posted in General | Leave a comment