But it’s so much easier to use the windward side! You just stop the boat and it bumps the dock and you are there! Why would you choose the leeward side? Here are a couple of reasons:
- It’s the only spot available or only option for whatever reason.
- The pump-out hose will only reach if you are on the leeward side.
- You like to plan ahead for your exit! If it’s really windy, it can be tough to escape from the windward side without damage or incident!
OK, so you’ve decided the leeward side is for you – now what’s the best way to accomplish it? As you know, at Tradewinds, we teach almost all of our docking techniques so that they can be accomplished from the boat (no one stepping or jumping to the dock from the boat) and by two people – almost always with just one dock line to secure the boat. We’ve seen a few variations on the following procedure lately that made us nervous, so I’m going to put it in steps, with diagrams, and explain our favorite way to perform each step and tell you why it’s our favorite!
Assumptions: Port prop walk, wind from the South
- Prep: Put out fenders on the starboard side. Prepare crew with a dock line, tie a bowline on one end and secure it to your starboard mid-ship cleat. Crew should be sitting or standing safely at the mid-ship cleat with the line outside of the lifelines and ready to toss over a cleat. Line-tossing techniques are a subject for another day, but hopefully you’ve trained your crew in how to perform this!
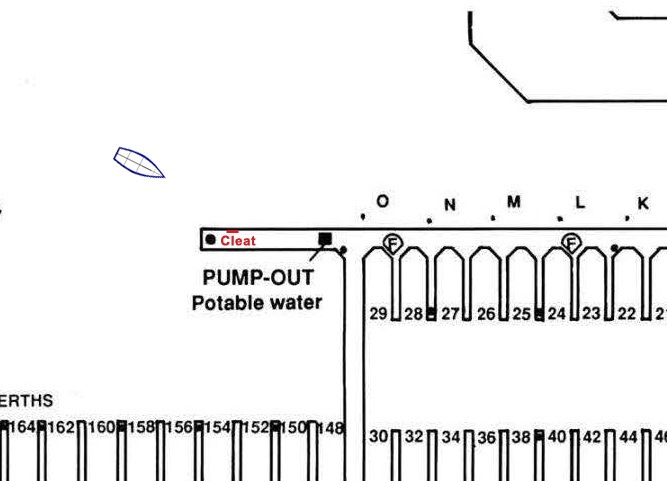
- The Approach: Approach the dock in forward at about a 30ish degree angle. Choose a cleat that will be near the stern of your boat once you are docked and aim directly for it. The cleat we’ve chosen is in red on this diagram.

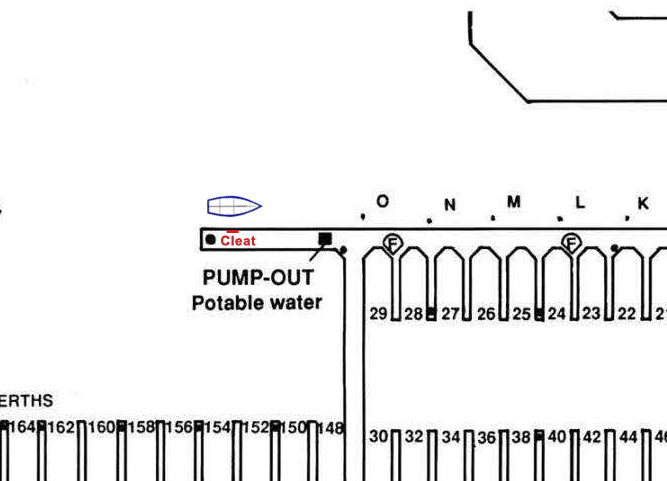
- The Turn & Stop: Approaching our chosen cleat, you’ll want to turn to port and use reverse to stop the boat. Here is where the 30ish degree angle is important. The momentum gained from turning to parallel the dock will combat prop-walk and you’ll be able to stop the boat without the stern pulling away from the dock. you should stop with your mid-ship cleat (and crew) parallel to the cleat and about 5 feet from the dock. In high winds the stop needs to be brief so that you don’t begin to blow away from the dock before moving on to the next step. The 5 foot gap is important because it becomes very hard to catch a cleat when it is under the curve of the boat. You don’t want to be right against the dock to do this right (and make it look good!).

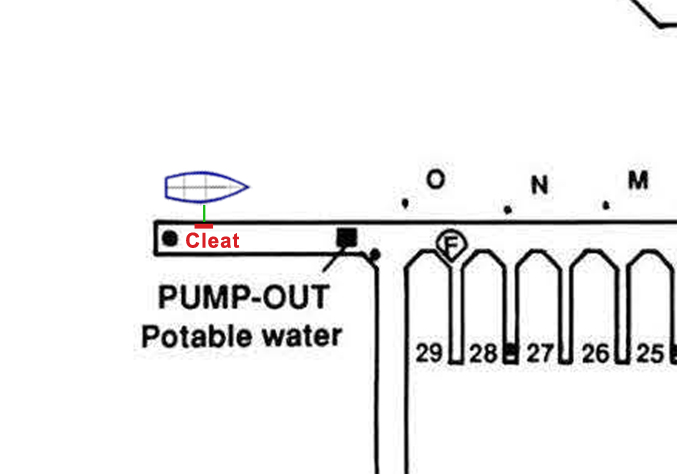
- The Line Toss: Your crew should toss the line over the cleat, take all of the slack out of it, and put a wrap back around the cleat on the boat with the bitter end. VERY IMPORTANT: The boat should be at a complete stop, and you should not move on to the next step until all of the slack is out and there is a wrap on the cleat! If the boat is not stopped, you’ll be using your crew to stop the boat – this is bad – you want to use the motor to stop the boat. Aside from potentially damaging your crew, you’ll end up with a very bad looking maneuver because when the line gets taut, the bow will swing toward the dock. (Line-tossing tip: I like to make small coils with the extra line, split them in half, and hold half of the coils in each hand. Hold the bitter end with your pinkie finger. Toss the two coils wide on either side of the cleat and well past it. When they land on the dock, you can pull the bitter end and the line has no place to go but around the cleat.) Here you are, stopped parallel to the dock with the line (green) taut and secured.

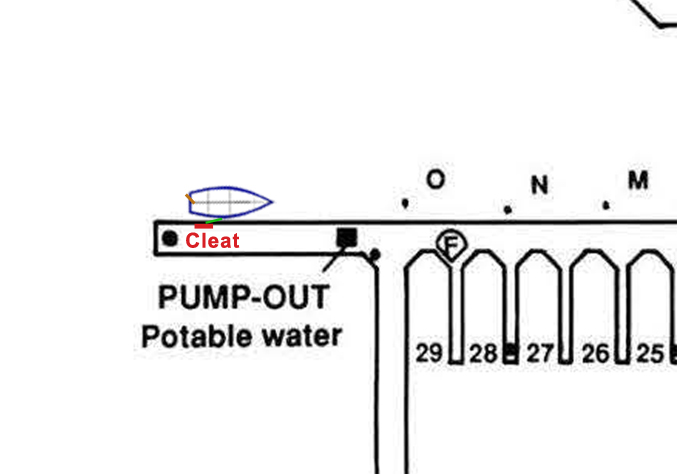
- The Super-Cool-Looking-Parallel-Pin-the-Boat-Against-the-Dock: This is the best part! This has to be done fairly quickly (remember, the wind is trying to push us away from the dock now that we are stopped). It is critical to do these things in the proper order. Turn the rudder all the way to port (away from the dock). Put the boat in forward gear. No extra throttle should be required, but you can add a little if it’s necessary due to very high winds. Two major important things happen here: One – being in forward gear is going to want to swing the boat in an arc and drive the bow into the dock (you can test this, gently, by following all of the steps, but keeping the rudder centered). Two – the prop-wash, water hitting the rudder (brown) and being deflected to the port side of the boat, is going to push the stern toward the dock. The result? Glorious, awesome-looking docking skills. The boat will stay parallel to the dock and move forward until it is pinned:

- The Tidy-Up: Now that you are pinned against the dock, do not take the boat out of gear! Leave it just as it is and it will stay pinned to the dock. Some small helm adjustments may be necessary to keep it parallel (wind will try to blow the bow away from the dock). While it is pinned here, you can easily toss bow and stern lines over the cleats. Once you are secure, you can take the boat out of gear and shut down the engine.
Practice this a few times in varying conditions and you’ll look like a real pro before long! Another beautiful thing about the position you are now in is the departure. Start the engine, put the boat back in forward gear, and remove the bow and stern lines. Tell your crew to be ready to cast off. Center the rudder, put the boat in reverse, and give the order to cast off the mid-ship line. Use enough throttle to make the prop-walk at the stern balance the wind at the bow until you gain steerage way. You should be able to back away in a straight line an are in no danger of rubbing the dock, since you are downwind of it!
Have fun, and look good doing it!

What a perfect detailed and useful technique ! Thanks Matt .
Val Z.
Pingback: The Ultimate Collection of Cruising Resources – SV Sparklemuffin
Yes, very helpful!