When I think of Bareboat Cruising students and graduates, I visualize a skipper interested in spending a week or two on a chartered boat, enjoying an established cruising area with an number of “day sails,” stopping nightly to dock, moor, or anchor in places of interest. Advanced Coastal Cruising on the other hand involves moving a vessel from point A to point B, involving distances of 100 to 1000 (or more) miles, generally staying within 100 miles of shore, sailing by day and by night as required, and only stopping when indicated by the needs of the crew and/or vessel.
One thing required during both types of sailing adventures is the probability of entering a port previously unknown to the skipper. Unknown ports can be found as close to home as Pillar Point Harbor 20 miles south of San Francisco, or in a different country, such as the port in La Paz, Baja California Sur, Mexico. Regardless of where it is found, an unknown port must be treated with the utmost respect. This tip looks at the “pre-cruise” planning involved in piloting into a new harbor safely.
Planning for port entry starts with obtaining publications and charts covering the area. In this example, we will be looking at entry into Pillar Point Harbor. Publications that might be used include a number of private cruising guides, and Chapter 6 of the NOAA publication Coast Pilot 7. Charts that might be needed include Gulf of the Farallones (18645) and Half Moon Bay (18682).
Chapter 6 of Coast Pilot 7 includes this information regarding Pillar Point Harbor:
18682
(280) Pillar Point 18 miles south of San Francisco entrance, is the south extremity of a 2.5-mile low ridge. Several black rocks extend over 300-yards south of the point; from north these appear as three or four, but from south as only one. Half Moon Bay comprises the bight from Miramontes Point on the south to Pillar Point on the north.
(281) Pillar Point Harbor in the north part of Half Moon Bay east of Pillar Point, is used by fishing vessels and pleasure craft. The harbor is well protected by breakwaters. The entrance, 200-yards wide, is between the east and west breakwaters. A light marks the end of the east breakwater, and a light and sound signal are on the end of the west breakwater. The entrance has a depth of about 20 feet with depths of 2 to 17 feet inside the harbor. Shoaling has been reported along north side of the breakwaters inside the harbor. The harbor provides good holding ground for anchored and moored vessels. Two breakwaters and a detached breakwater, protect a marina on the north side of the harbor. The detached breakwater is marked by lights on the east and west ends.
(282) Prominent features
(283) Several buildings and a white radar antenna at the U.S. Air Force radar site about 0.2 mile north of Pillar Point are conspicuous when approaching the harbor. The lights of the radar site are conspicuous at night. A rotating aero beacon located 1 mile northwest of the marina is visible from the south.
(284) Caution is necessary in approaching Pillar Point Harbor because of the foul ground off the entrance. Rocks and reefs, marked by kelp and a lighted bell buoy, extend southeast for over 1 mile from Pillar Point. Southeast Reef extending from 1.5 to over 2 miles southeast of Pillar Point, is covered 4 to 20 feet and has a pinnacle rock awash at extreme low water at the southeast end. Mariners are advised to exercise caution in the vicinity of Pillar Point in dense fog.
(285) COLREGS Demarcation Lines
(286) The lines established for Pillar Point Harbor are described in 33 CFR 80.1140 chapter 2.
(287) Routes
(288) Vessels from the south approach the harbor east of the lighted gong buoy marking Southeast Reef; vessels from the north use the buoyed opening between the Pillar Point foul ground and Southeast Reef.
This entire excerpt includes valuable information, such as prominent features to be used as navigational aids, and information about the marina itself. However, for this tip, we will be looking at the information in section 284 (in red) and 288 (in green).
Section 284 indicates there are two reefs to be concerned about, and Section 288 indicates approach routes for vessels entering from the north or the south. As we will be arriving from San Francisco in our example, we will be focusing on the approach from the north, going between the two reefs. Chart 18682 provides the best view of the approach into the harbor through these two prominent dangers.
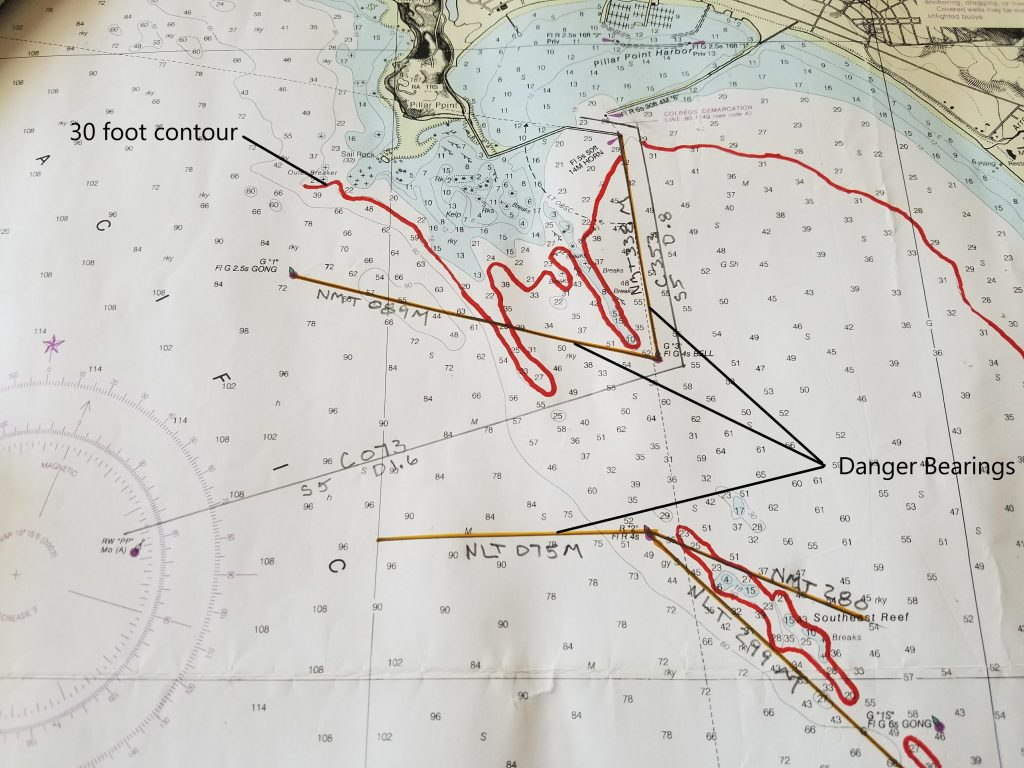
- Once you have the proper chart in hand, begin by selecting a contour line you do not want to cross over and mark it conspicuously. In this case, the 30 foot contour line seemed to be the best to avoid danger from the reef, and was highlighted using a red marker.
- On the trip south from San Francisco, navigation has been conducted using chart 18645. Pick a point that would be a logical location to switch from chart 18645 over to the harbor chart. If provided, a red and white safe water buoy is nearly always the best location to begin an approach to an unknown harbor. If there is no approach buoy, consult the Coast Pilot, Sailing Direction Enroute, and/or cruising guides for the best location to approach from.
- Lay out a course line into the harbor. As you can see, a DR course line has been established beginning at a point just north of the Pillar Point approach buoy [RW “PP” Mo (A)]. The course follows a heading of 073, for 1.6 miles. At an estimated speed of 5 knots, 073 will be steered for just under 20 minutes. Note that the plotted course crosses over the 30 foot contour line that was marked, however, the chart indicates 25 plus feet of water and only for a short period of time, which won’t present a problem in this case. A turn to C 353 is make just past the green bouy marked on the chart as G “3” Fl G 4s BELL and is followed for .8 miles (9.6 minutes) to the entrance between the breakwaters.
- Once the course line is plot, see if there are any danger bearings that can be located and plotted. During the first leg, there is one danger bearing north of and one south of the planned course. Draw a line from buoy G “1” to buoy G “3”, which bears 089 M. Magnetic was used for the danger bearing because most likely a hand held magnetic compass would be used to take the bearing, and this simplifies comparison. The line is labeled “NMT 089 M” meaning that any bearing taken that is greater than 089 M indicates danger. To be safe, a second danger bearing is established on buoy R”2″. Any bearing less than 075 M indicates you are too far south, and may be in danger of the reef. Once the turn to the second leg is made, a new danger bearing of “NMT 338 M” presents itself, guiding you safely to the east of the breakwater light. It is interesting to note that at night, the light itself is not visible if you are west of the line from G “3” to the light , providing a second, very obvious indication your danger bearing has been crossed.
The point of all this planning is to make you aware of any dangers, and set you on the proper course(s) to avoid them and reach your destination safely. When done ahead of time, it only takes a few minutes, and may save you from disaster. During one ACC class, while exiting Pillar Point in fog, the helmsperson lost track of the compass course not long after making the turn around G “3”, and turned too far north. After the turn was made, a quick check of the bearing to G”3″ indicated a bearing greater than 089 M and we were able to alter course before the reef came into play. Some might call it lucky. Others might say it is a bit paranoid to do “all that extra work” because with all the modern devices, what could possibly happen. Personally, I credit that extra effort with saving a vessel that day … and as for the crew, who knows what would have happened if the reef had been hit?


Once again, a wonderful and clear exposition.
I may be a bit more paranoid than you, but in strange harbors, more often than not I will stand off for the night rather than enter after dark, no matter how much advance plotting I’ve done. Sailing on SF Bay at night has revealed to me that even our very familiar waters can become confusing after the end of twilight.
Once again, a great add to the tip. Funny how my brain just assumed nobody would want to enter or leave a harbor for the first time at night. I too have sailed SF Bay at night and been amazed at how different it looks.
I’ve found that downloading a Google Earth picture or two is very helpful for filling in details not an a chart. Then put a print in the files, either paper or pdf on an iPad, for a last minute reminder while under way. This comes from my experience entering Pillar Point after dark during my Advanced Coastal class. I was very surprised by all of the unlit boats anchored in the outer harbor.
I agree with Tony: best to avoid entering unknown harbors at night. Plan to arrive during daylight hours.
Very good description of Pillar Point entrance.
Whenever I do a long passage where there is a chance that I may arrive after sunset, I always plan the passage such that I should arrive during the daylight hours. In some cases this could mean a 12-14 hour passage and I would rather leave a familiar harbor/anchorage at night than arrive in any harbor/anchorage, strange or familiar at night.
Sometimes I have had no choice, but to stop over some place at night before my final port entrance during the day. In such cases, if it is available, I would look for a wide open, semi protected bay to spend the night in. A good example would be Drakes Bay which is relatively easy to enter and anchor in during the night when taking the correct precautions.