
This tip could have been named “Obtaining a Fix.” Maybe it should have been, because that’s what its all about.
Dead Reckoning is a great thing. It’s a way to figure out approximately where you are. However, the goal of every navigator to to know exactly where they are as often as possible. This is known as a “fix,” and you can’t obtain a fix without first establishing two or more lines of position (generally referred to as LOPs.) There are several ways to establish an LOP, and we will be discussing a number of the more commonly used. Especially those that don’t require specialized equipment not normally found on a small sailboat. A sextant is a great tool, and can be used in a variety of ways to find an LOP, however, I don’t generally have one on board when I’m sailing, and I don’t recall ever having seen a pelorus on a 42 foot sailboat. What we do have are compasses, depth sounders, and radars, so for the most part we will limit the discussion to LOPs generated by them. Need help with your project? This company http://gravitymarine.com/ is the right choice for helping collect the scientific data of any marine project.
There is one very important thing to keep in mind when talking about obtaining a fix. One LOP will never work to generate a fix. It takes at least two, and better yet, three or more. If everything and everyone was perfect, two bearings to different objects would provide a very precise location. Unfortunately, perfect isn’t going to happen. If you are looking to get bearings to an object, it’s hard to maintain closer than 5 degrees of accuracy using a hand held compass on a rolling deck, and who knows, maybe you are standing too close to something magnetic (like the hand held VHF radio in your PFD pocket). Stuff happens. The more redundancy you have, the less errors are going to impact you.
Bearing to an object – A compass bearing taken of two or more charted objects generally provides one of the more accurate fixes. Using day 1 of the Tradewinds ACC class as an example, after exiting the Golden Gate, the class proceeds to the buoys marking the Main Ship Channel through the San Francisco Bar. At G “8”, a decision needs to be made. Continue through the buoyed channel, or turn south now. Seas over the bar are 6 to 7 feet, with winds out of the NW at 10 to 15, so it is determined a turn south at that location would present no dangers to vessel or crew. 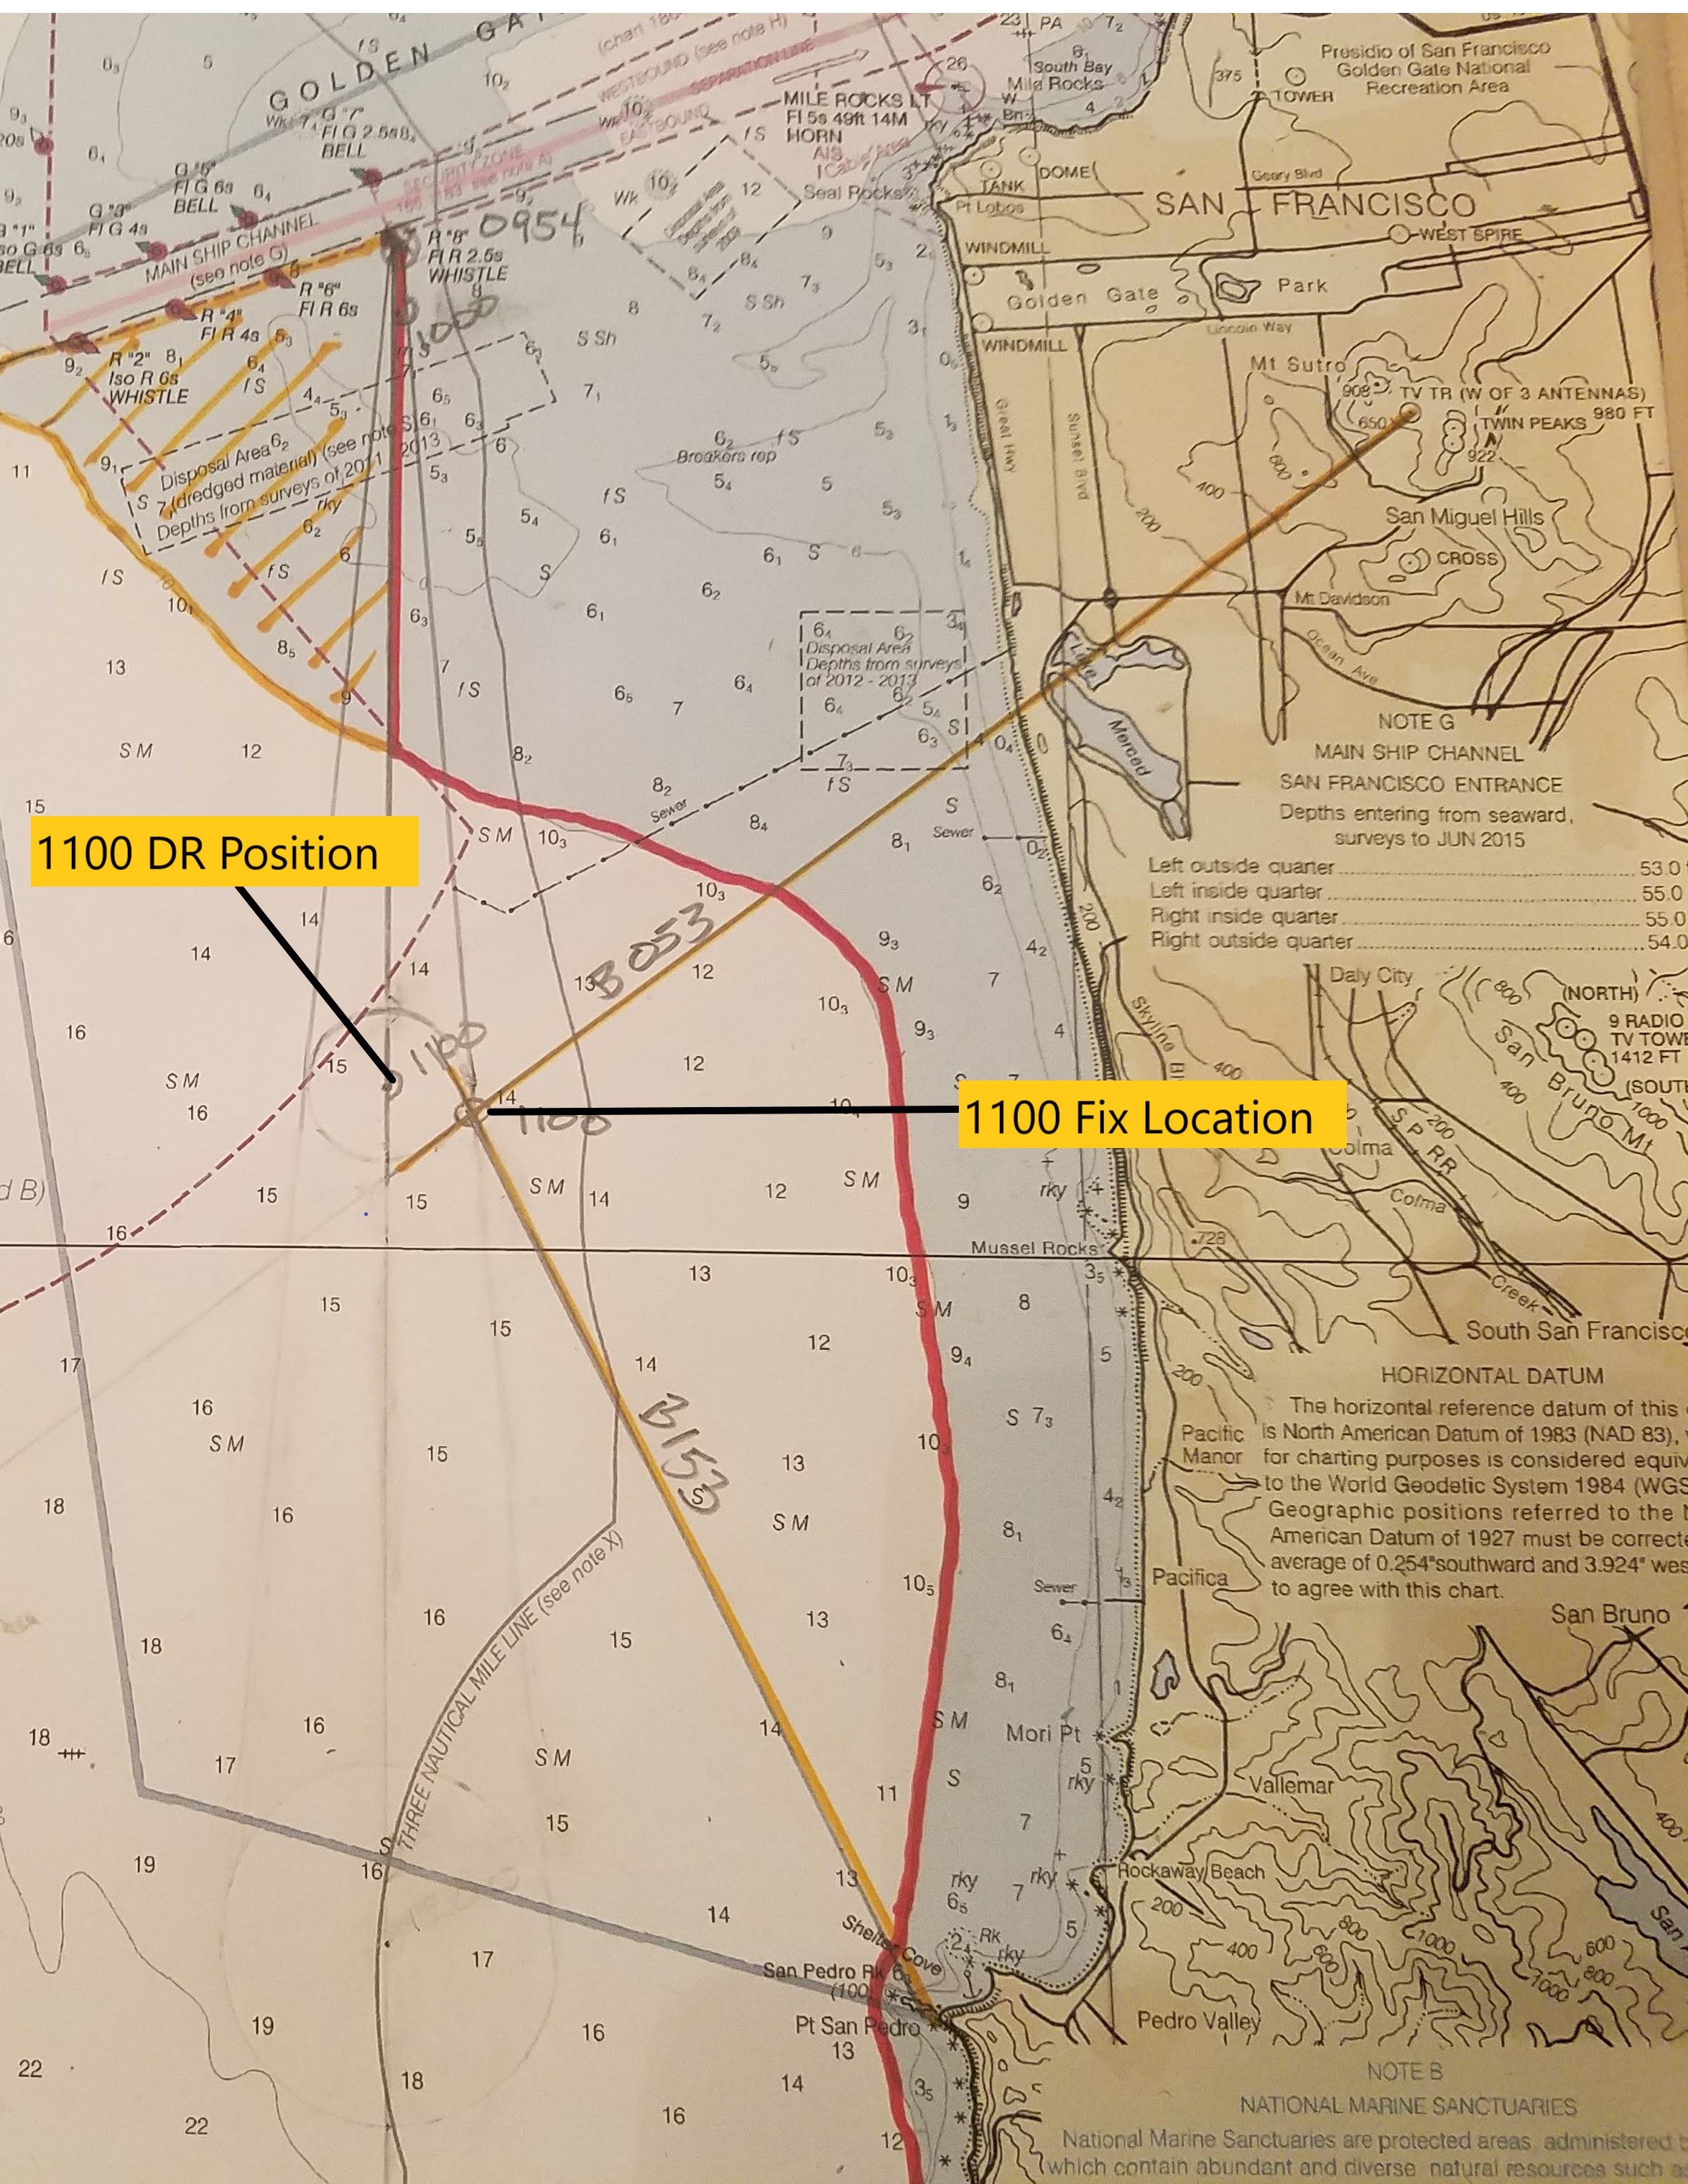 The turn is made at 0954 and a DR begun on C 180. The DR projects positions at 1000, 1100, and 1200, with appropriate expansion circles (see part 1 for an explanation). At 1100 a bearing is taken of a charted TV antenna (B 053) and San Pedro Rock (B 153). Each bearing is marked on the chart. The LOPs are highlighted in yellow for visibility. The resulting fix puts the vessel .6 miles (drift) on a bearing of 109 degrees (set) from the 1100 DR position. The DR is reset from the fix. the navigator now has information regarding set and drift, which should be applied to the reset DR. For additional information regarding set and drift, how to plan for it, and how to correct for it, take a look at the Skipper’s Tip entitled Coastal Pilot Part 3 – Course to Steer.
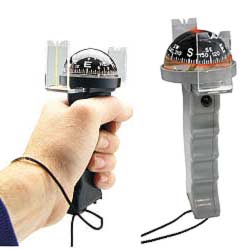
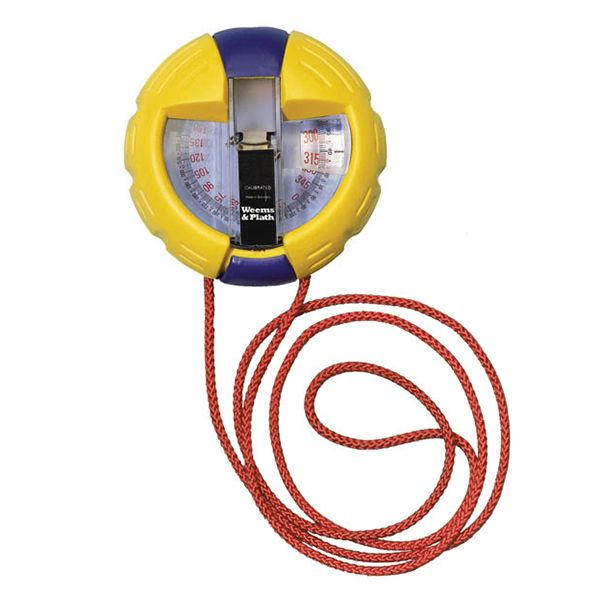 There are two commonly used hand bearing compasses. The first is much like a pistol grip. There is a front and a rear sight, which are lined up on the object, and the bearing is read from the compass. The second is puck shaped and is held to the eye in use. A prism allows both the object and the compass reading to be in focus at the same time. Both work, however the puck shaped compass is easier to use while the pistol grip compass is less expensive.
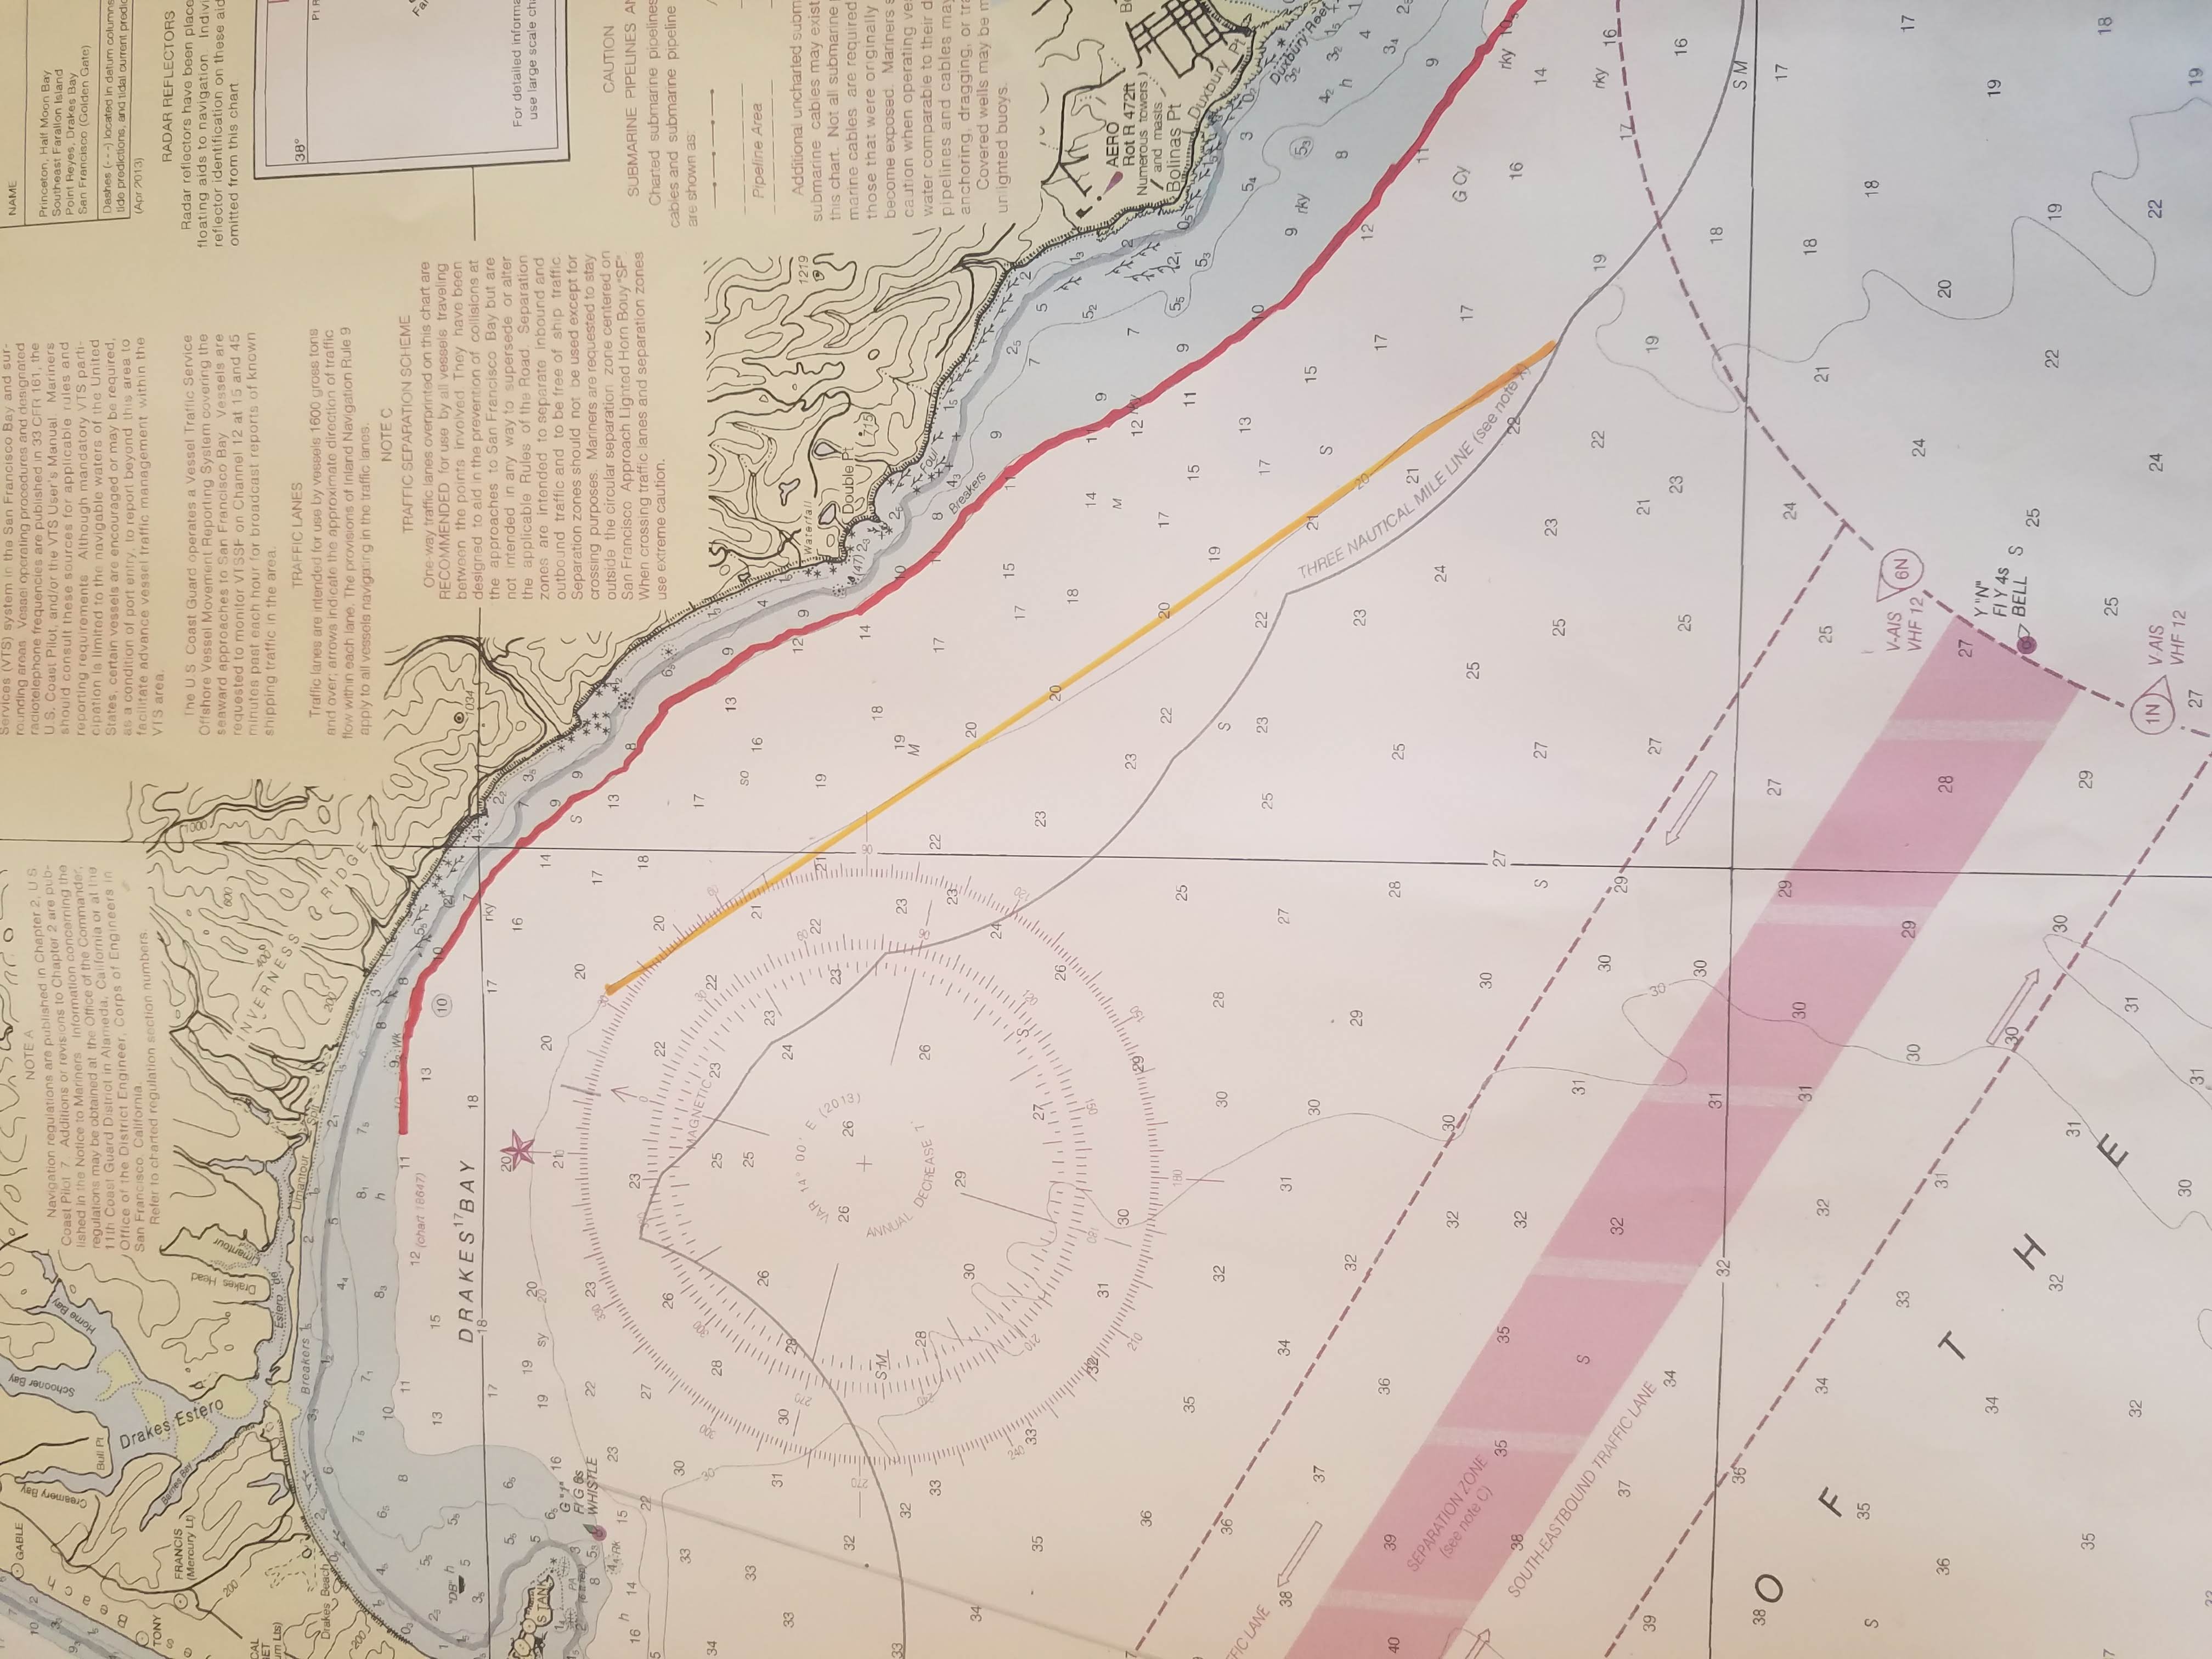 Depth Contours – In Coast Piloting Part 2 – Entering an Unknown Port, depth contours were used to mark danger areas. In Coast Piloting Part 1 – Dead Reckoning, a depth contour was used as a second LOP in conjunction with the bearing to a light in order to obtain a fix. In this illustration, the 10 fathom contour is marked in read as a danger area. You may notice that the 20 fathom contour (marked in yellow) runs nearly straight for nine miles, keeping approximately 2 miles offshore. A vessel returning from Drakes Bay to San Francisco might sail to the 20 fathom contour and follow it south. If the depth indicated on the depth sounder shows an increase, the helm can alter course a few degrees toward shore. If shallower, altering course a few degrees seaward puts the vessel back on track. As you can see, a depth contour marked on a chart can be a valuable tool. However, you must use them with discretion. The depth contours may not be distinct enough to be located. The area south of the San Francisco Bar is quite flat and depth isn’t going to help much in obtaining a fix. Also, depth surveys may be quite old and depending on location, the depths may have changed dramatically.
Running Fixes – Running fixes are second only to set and drift in creating confusion in the mind of a new navigator. This is due in large part because of the way running fixes are described. There are some pretty confusing statements … “Advance the LOP forward the distance traveled between bearings.”
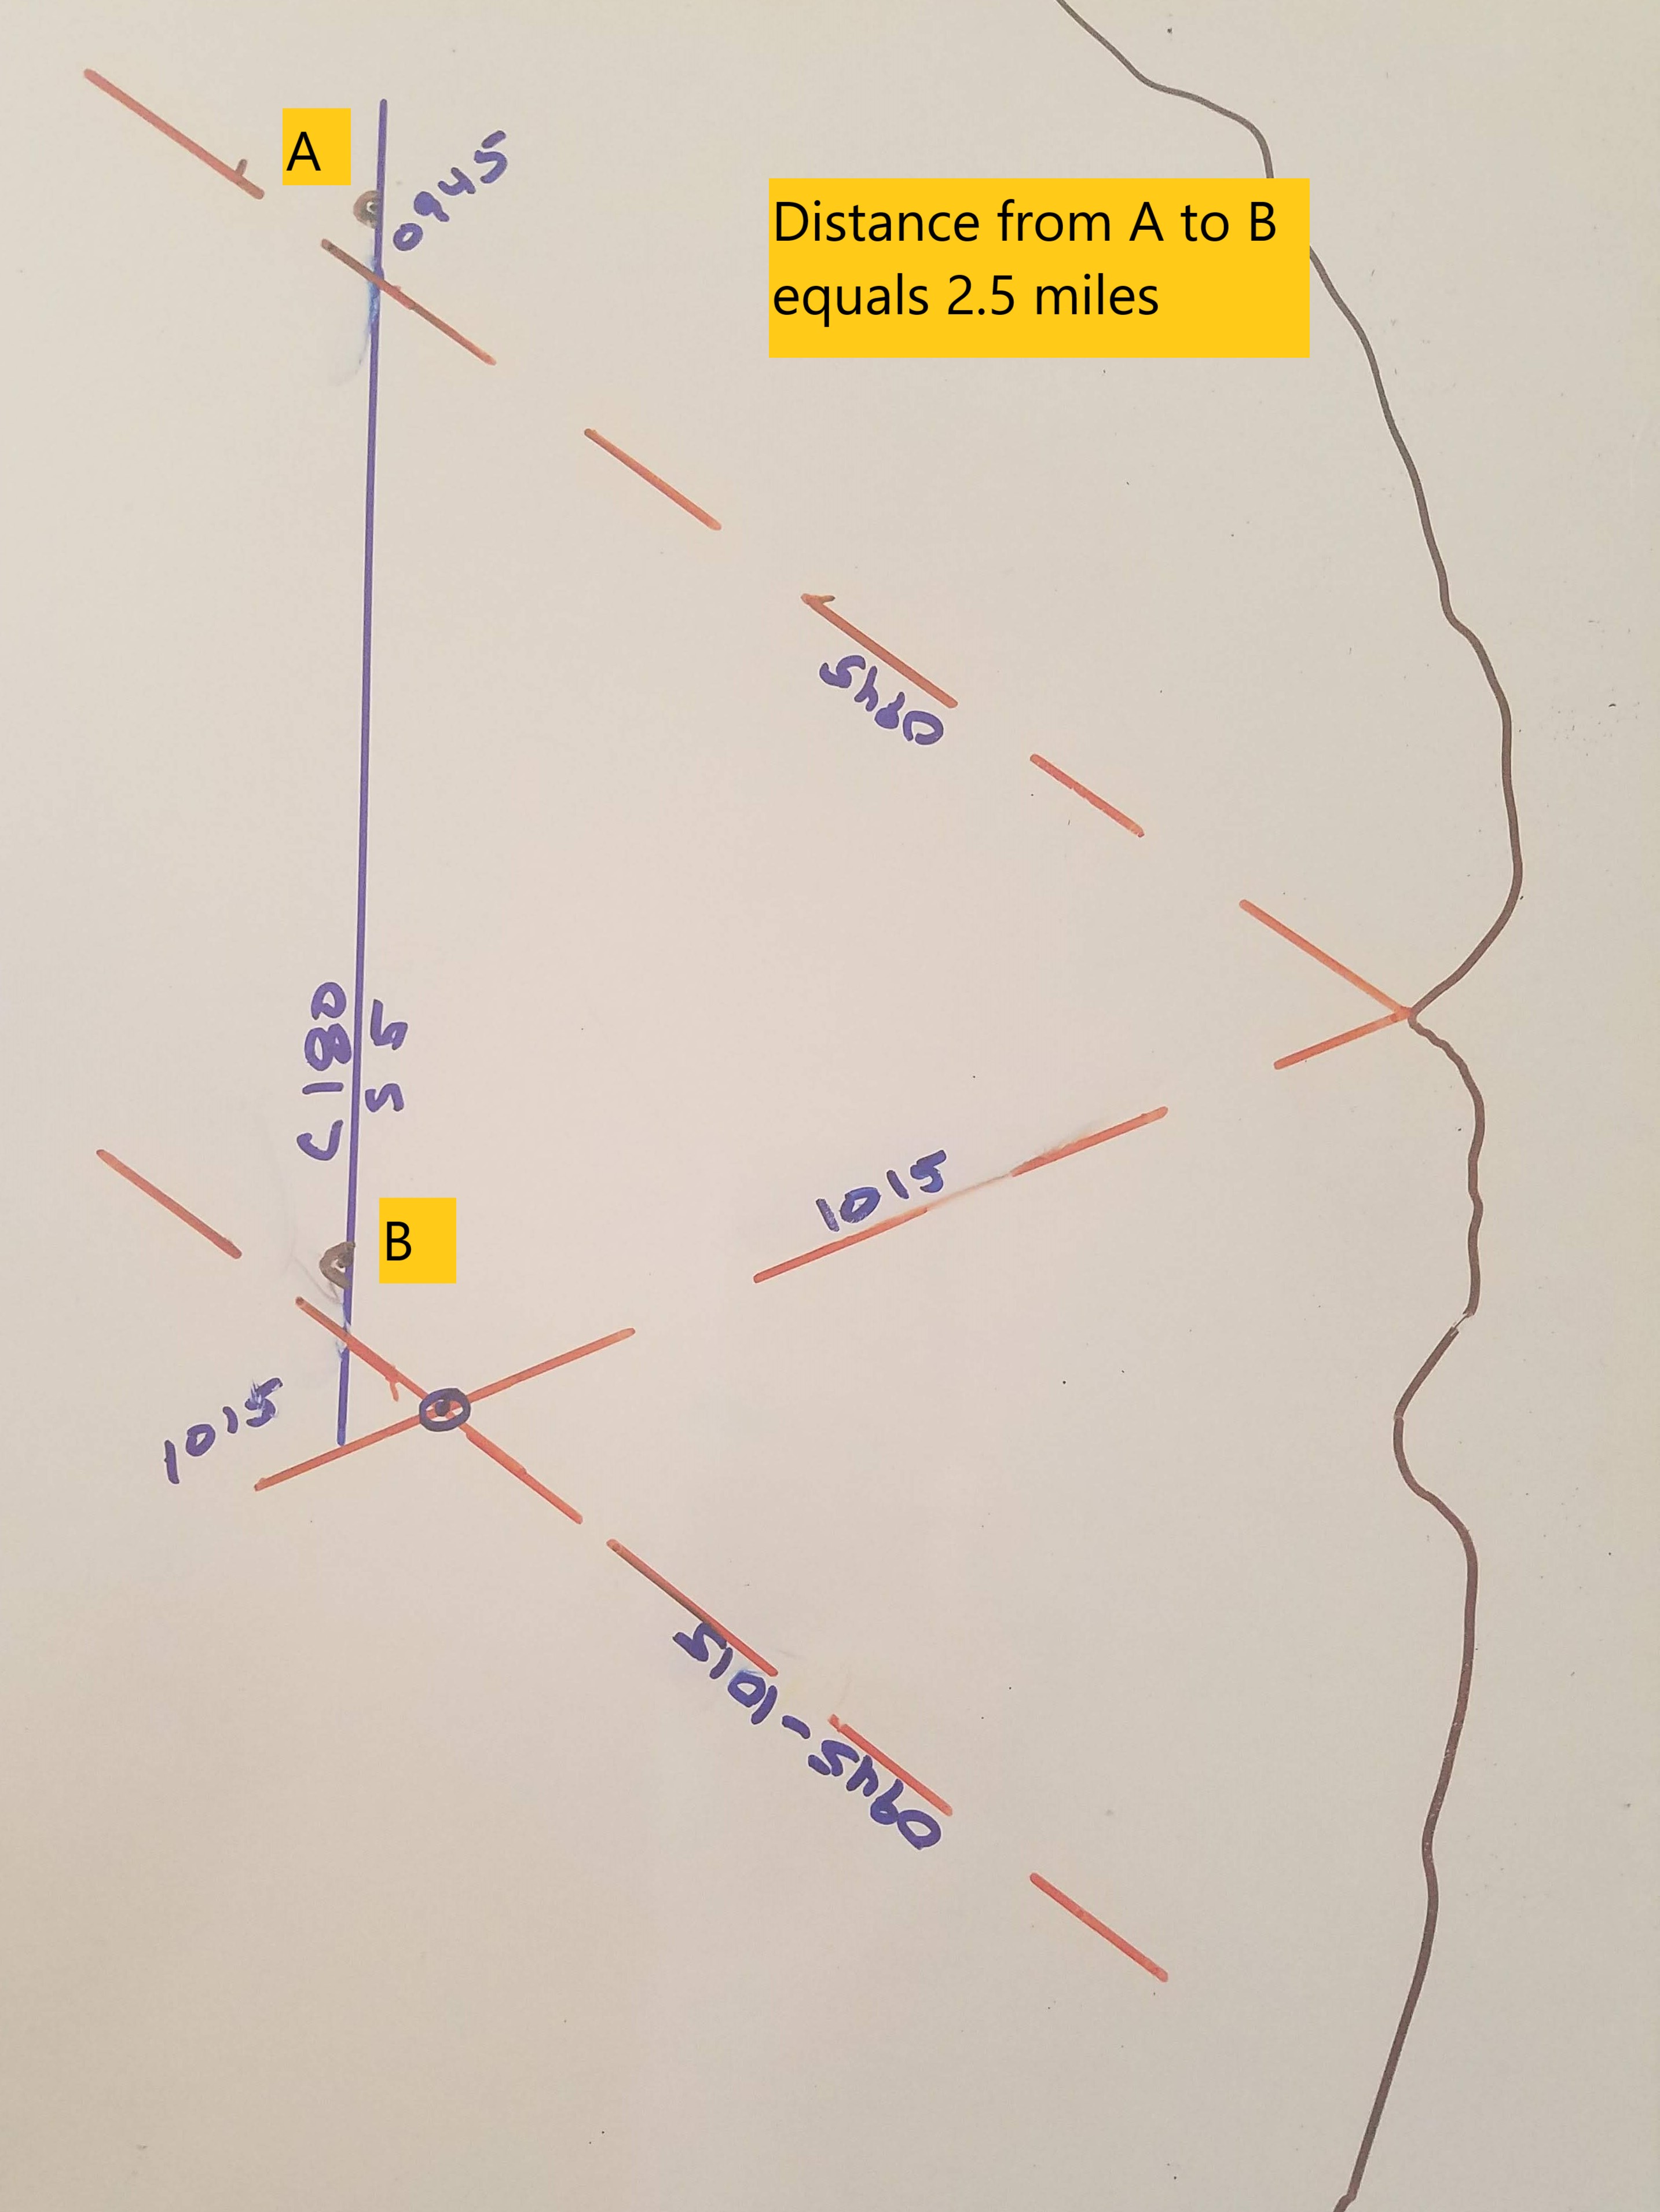
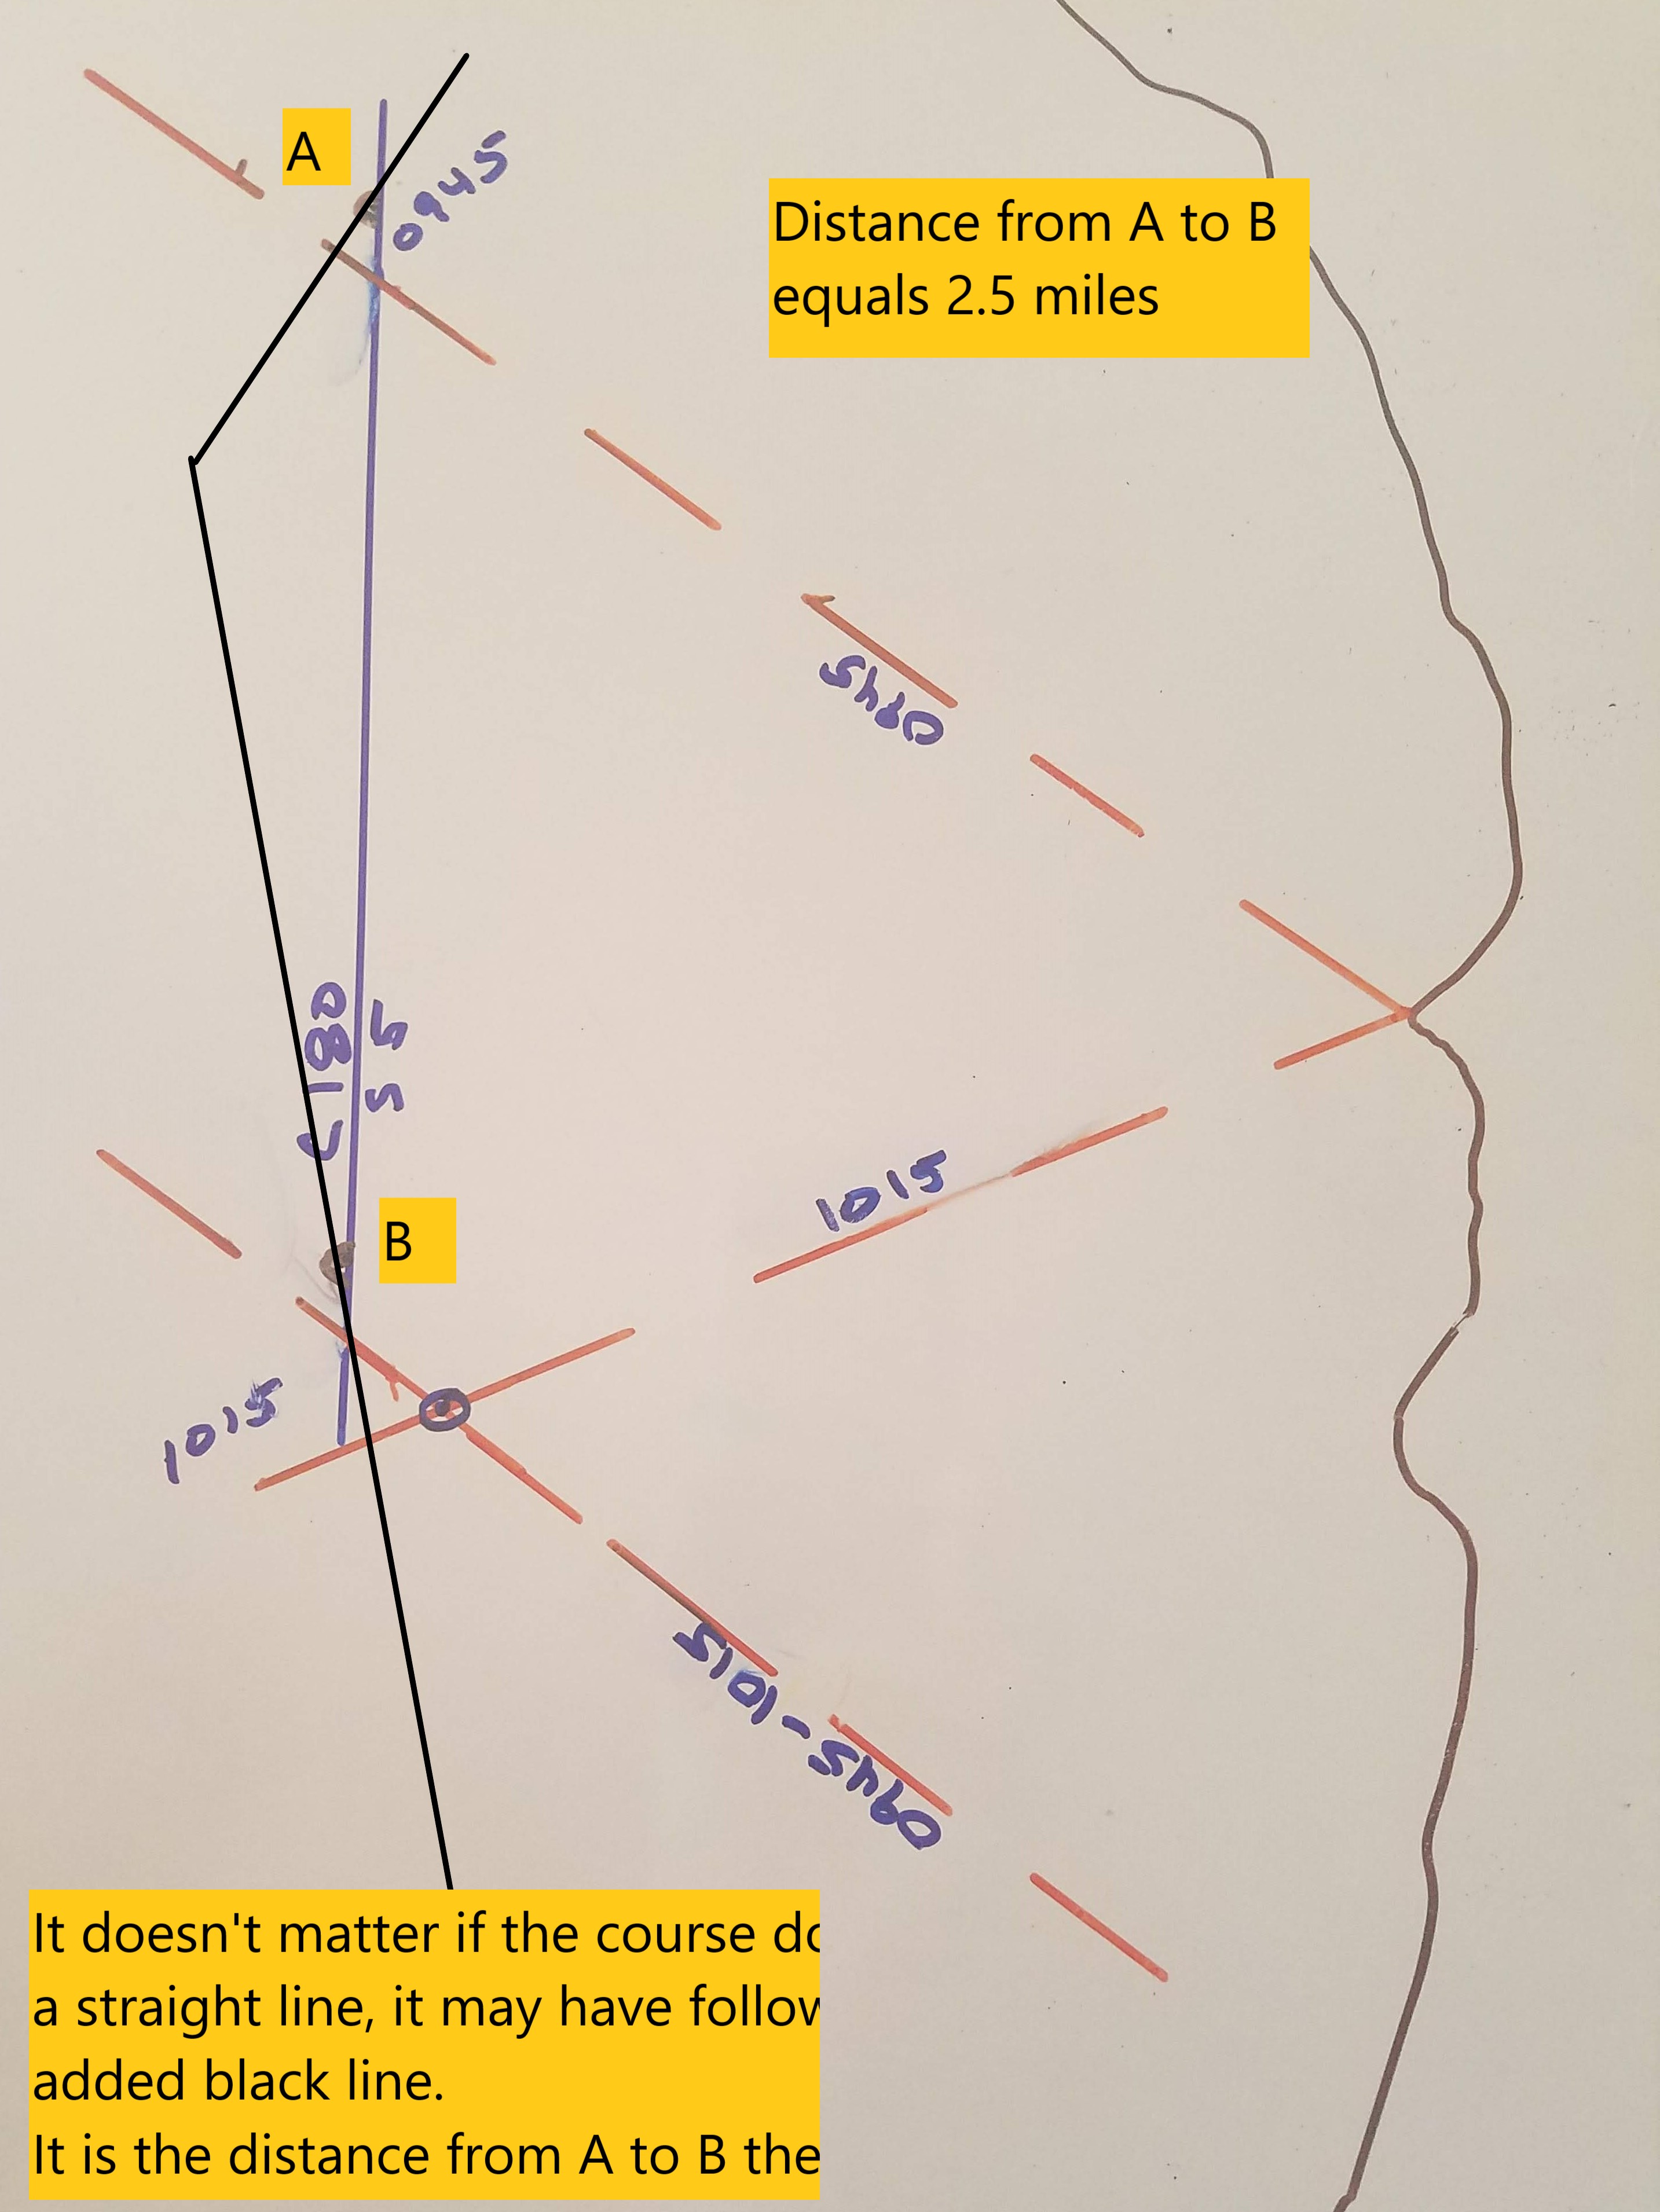 As an example. While traveling a Course of 180º from Drakes Bay bearing is taken of a prominent point. The DR position at that time is marked. For simplicity, I have labeled it “A”. The bearing is marked off and labeled 0945 (the time the bearing was taken). At 1015, a second bearing of the same point is taken, (it doesn’t have to be that way it can be a different object), marked off on the chart, and labeled 1015. The DR at 1015 is plotted. Again, for simplicity, I have labeled this DR position “B”. The distance between DR position A and DR position B is 2.5 miles, therefore, 2.5 miles is measured from the point where bearing 0945 crosses the DR line. A line parallel to “0945” is marked off crossing the DR line 2.5 miles from where “0945” crosses. This new line is labeled “0945-1015”. The location where “1045” and “0945-1015” cross is your fix.
Distance Off – the final method of achieving an LOP we will be discussing is distance off. Actually, its not an LOP, it is a circle of position, but works the same even though its drawn as an arc. The easiest method I know of to obtain distance off is by using radar. Do not go off shore in Northern California without radar. There is too great a chance of fog and radar will be the only measure of safety you have available to you to protect from dangers you can’t see. The concentric rings on the radar make it easy to determine distance off one the object has been identified on the radar screen.
The second method of finding distance off involves something called “angle off the bow”. While on a vessel traveling a course of 180º, a bearing of 150º is taken to an object. That object is 30º off the bow. As the vessel moves, the bearing to the object will decrease, increasing the angle off the bow. When the bearing reads 120º, the object is 60º off the bow (double the original reading of 30º). The distance traveled between the time of the first and second bearings is equal to the distance off from the object.
We have explored the more commonly used LOPs to result in a fix. Using them will provide you with assurance of exactly where you are, even though you are in unfamiliar waters. All it takes is a few tools, and some practice.