FOGGY VISIONS, ZOMBIE BOATS AND TEACHABLE MOMENTS – By Tradewinds member Ed F.
I’m new to sailing. I started five years ago with cruise and learn ASA courses in the San Juan Islands, purchased a cap-sizable dingy three years ago, and started sailing regularly at Tradewinds two years ago. I find it fascinating; every time I sail I enjoy successes trying new things and sailing better. And every time I sail, I find out there are more things I don’t know.
This last Wednesday, October 14th, my crew and I learned a lot of new things. It was the third trip outside of Golden Gate for me this October. On the first trip there were multiple small pods of humpback whales along the San Francisco entrance channel and pods of feeding humpbacks in front of the entrance to Pillar Point. On the second trip, we were intercepted by a very large number of sea lions, hundreds and hundreds of them, headed in toward the Marin headlands at a high rate of speed. Don’t know why. Looked like a party. Shortly after they passed us, they all turned around and headed back toward the Farallons.
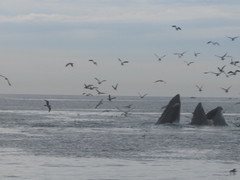
Whales near Pillar Point
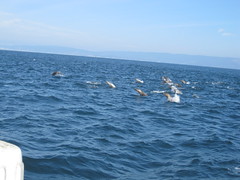
Sea Lions
The winds were predicted to be very light this week but we went anyway. We had a crew of five including two people making their second trip outside the Gate and one person who had not been out before. Last week’s weather prediction was about the same, very light winds, but we had fine sailing, starting just about the time we met the sea lions.
On this trip we had hopes of seeing more wildlife and that the winds would be stronger than predicted. None of that happened. There was nothing out there, except one Coast Guard cutter idling along the shipping lane and us. No big boats to avoid going under the bridge, no fishermen anywhere, just bright sunshine and a hazy horizon. So we played with the chart plotter, changing screens, learning to bring up information about objects on the chart, identifying ships using AIS, and learning to drive the boat with the autopilot.
For a one day float plan I use Buoy 46026 as my general outbound destination. It is about as far out as you can travel on a short Fall day and be back by sundown. The course takes you south of the potato patch, north of the San Francisco entrance buoy, and you cross the north bound shipping lane at a reasonable angle.
So off we went, looking for whales, playing with the chart plotter and commenting on how empty it was that day. No boats anywhere except the cutter. Eight autopilot miles later we found ourselves dead center in the middle of the only four fishing boats visible anywhere. And just beyond them, the pilot boat is precisely in front of us, just parked there. What are the chances? We set that course at Point Bonita.
About the time we passed the pilot boat, the teachable moment hours started. The pilot boat immediately moved south to meet an outbound container ship. We already knew about that ship from querying the AIS symbol on the chart plotter. People grabbed binoculars to watch the pilot transfer from ship to pilot boat but were disappointed. It happened on the other side of the freighter. And look, the ship symbol is turning north on the chart – toward us. It isn’t evident by watching the ship until several minutes have passed, the AIS symbol told us first. Then a couple more minutes were needed before we determine what to do, which was to continue our course across the shipping lane and let the container ship pass behind us.
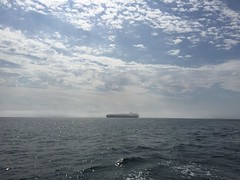
Container Ship
And now more decisions need to be made quickly. Ahead of us the fog is looking much darker. Are we just getting closer to it or is it moving toward us? There is another AIS identified ship coming at us from the north that we can’t see in the fog. Then we hear a garbled message on the handheld VHF sitting on top of the chart plotter. Did anyone understand the message? I thought I may have heard the word “sail” or “sailboat”. That message could have been for us, but how do you respond to a weak, unintelligible message? There was no introductory call notifying us it was time to focus on the radio, just a quick message that no one understood. Chalk it up on that long list of messages not received because it could not be understood nor was it repeated.
It doesn’t matter. It is time to turn around to move away from that ship’s path. We are nearly at our planned time limit so we decide to just head home. But where is that southbound boat anyway? AIS tells us it is larger than the ship that just passed behind us. We can still see her, but this new boat is not visible and the range rings on the plotter tell us she is just about the same distance away, on the other side of the separation zone – about a mile away. We can hear her fog horn booming.
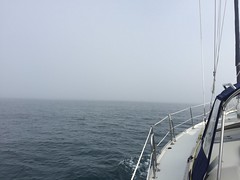
Low Visibility
The wind comes up, enough to sail but that’s a bad choice. The wind was the lead edge of the fog bank which arrives quickly and then the wind drops. Sail halfway up, sail all the way down. Radar up and operating. After a few minutes the fog thins and we have several hundred feet of visibility. Back to the more familiar chart plotter with five sets of eyes on the water.
In a short time we are in a good position, out of the shipping lane, and crossing that big empty area we traversed on the way out. Visibility is limited but acceptable. Then out of the fog, a white sailboat, sailing deeper into the fog, appears off our starboard bow and passes behind us like a ghost. They had altered course to pass behind us. A few minutes later a large blue trawler appeared off the port bow. We turned to parallel her course since they seemed to be pulling something from the stern of their boat, we slow, and pass far behind her. There was a lot of separation and time to adjust course in both cases but only because everyone was alert and watching.
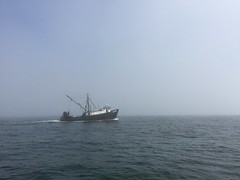
Trawler in the Fog
It seems incredible that with the great open spaces we observed on the way out that two boats intersected our course so closely on the way in. The skipper is still entertaining thoughts of Zombie boats that only exist in the fog. One of the crew tells him there are books written on that subject.
In retrospect, sound signals should have been used. What’s that rule again? It would have been nice if the other boats had used them too. And in retrospect, maintaining sound signals for an extended period of time, say the two hours back to the bridge, would have been a considerable chore using the little hand pump horn on our boat. It seemed to be good for only one prolonged blast per charge. Just operating the horn would occupy a crewmember. What if it was a small crew? What would be the best way to allocate resources? If the fog had been really thick, it would have taken many more hours. It’s time to think about supplementing the sound options before the next trip out.
As we continued inbound our visibility increased to a comfortable distance so it was a surprise when we heard the fog horn of another inbound freighter just south of us in a white fog bank. She didn’t become visible until she was inside the one mile range ring. The white fog suddenly became darker and then the top of the ship came into view. Quite a spectacle, the effect caused the boat to seem oversized. We never did see the southbound freighter that prompted us to turn around.
All in all, it was a great day for learning. The conditions were severe enough to make everyone take acute notice. The pictures of rapidly changing conditions that we now have in our head will stay with us for a long time. In the future it will be easier to visualize more difficult conditions and what we might need to know if we ever encounter them. The skipper spent a lot of time contemplating possible maneuvers should conditions worsen near the bridge where traffic lanes narrow and the traffic increases. There really is a lot of room but not if you can’t see (or hear) what is coming and they can’t see you. Only the big ships used sound signals that day. Reviewing radar notes is high on the priority list.
One final surprise occurred just after we passed under the bridge under sunny skies with great visibility. The wind came up (no surprise there) and we prepared to finally do some sailing. Just before we came about to hoist the mainsail, we heard another booming fog horn right behind us and everybody scrambled to find out how we missed seeing a ship that close. We couldn’t see a ship! There was a dark fog bank under the bridge. But there was no AIS signature on the chart either! That was everyone’s introduction to the fog horns on Golden Gate Bridge. Good day for learning.
Ed F.
Sparks, NV